Audi Q5: Sunroof Shade, Removing and Installing
Removing
- Open the sunroof shade all the way.
- Remove the rear glass panel. Refer to → Chapter "Rear Sunroof Panel, Removing and Installing".
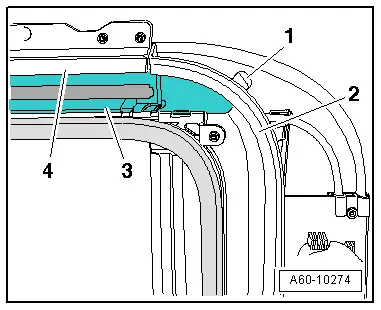
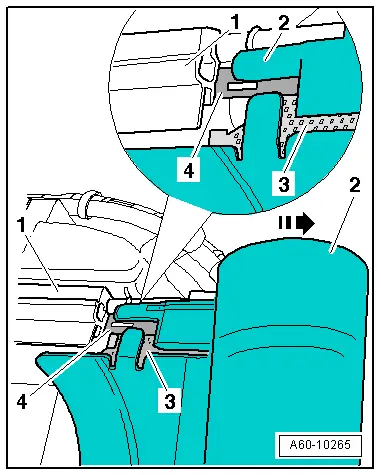
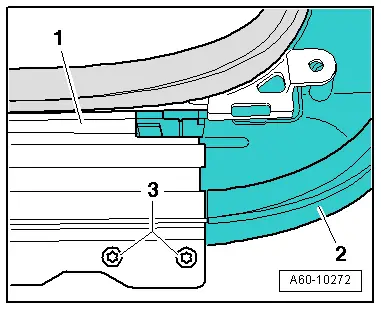
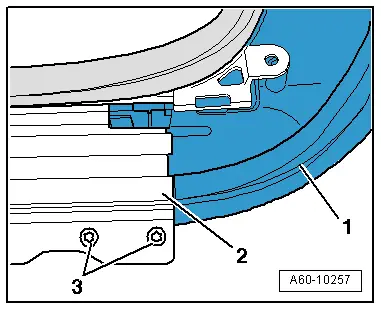
- Remove the screw -3- from the cap -2- (2 Nm).
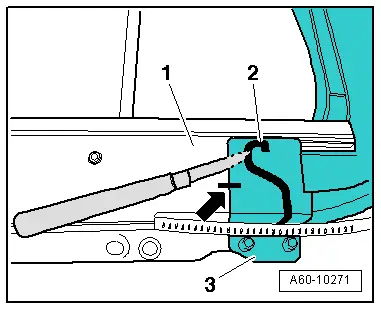
- Unclip the catch -arrow- on the cap -2- from the frame with a screwdriver -4- and remove the cap -2-.
The inner seal -1- is not removed.
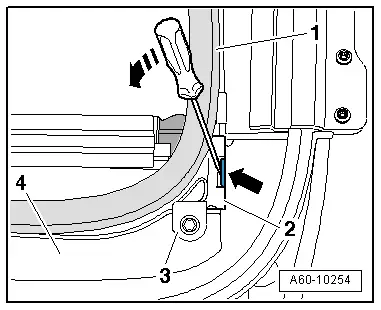
- Carefully lift the sun shade arch -2- together with the sun shade glide -1-.
 Note
Note
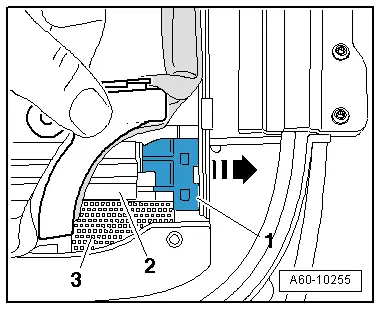
Be careful not to damage the sun shade material -3-.
- Remove the sun shade glide sideways -1- in direction of -arrow- from the sun shade arch -2-.
- Remove the headliner. Refer to → Body Interior; Rep. Gr.70; Roof Trim Panels; Headliner, Removing and Installing.
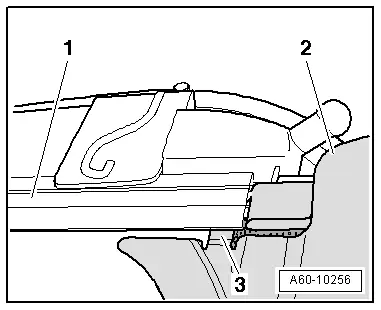
- Remove the sun shade cartridge screws -1--2- (3.5 Nm).
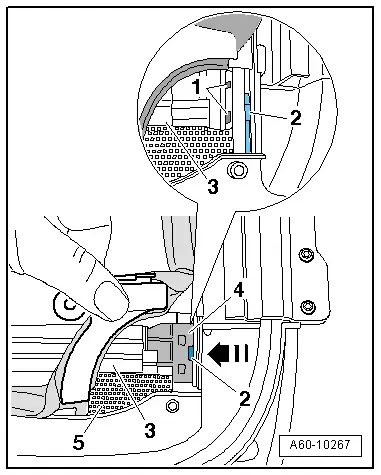
- Pull the sun shade cartridge -2- in direction of -arrow- slightly downward on the sun shade motor -3-.
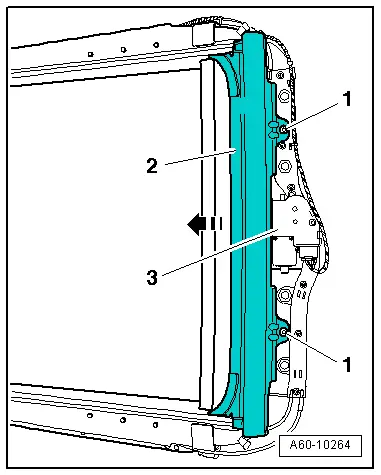
- Pull the sun shade cartridge -2- and the sun shade steel band -4- in direction of -arrow- out of the sun shade rail -1-.
Remove the sun shade to replace the sun shade arch.
- Remove the sun shade arch -1- in direction of -arrow- from the sun shade material -2- piping -3-.
- Install the new sun shade arch -1- on the piping -3-.
Installing
 Note
Note
- The sun shade arch must be mounted prior to installing the sun shade cartridge.
- Do not lubricate the sun shade slide and cables.
- Install the sun shade cartridge -2- and the sun shade steel band -4- opposite the direction of -arrow- into the sun shade rail -1-.
 Note
Note
Be careful not to damage the sun shade material -3-.

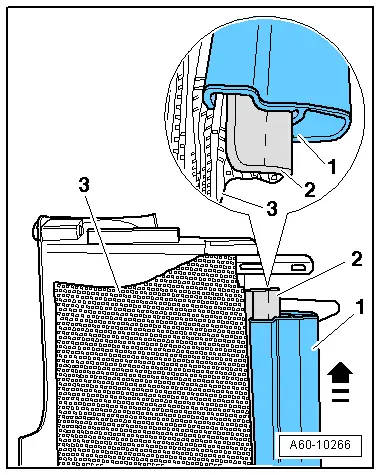
Press the sun shade cartridge strap -3--2- under the sun shade rail -1- .
- Install the sun shade glide -4- in direction of -arrow- into the sun shade arch -3-.
 Note
Note
The sun shade glide -4- must engage into the opening in the sun shade steel band -1- and into the sun shade coupling plate -2-.
Install in reverse order of removal.
Tightening Specifications
- Sun shade cartridge screw 3.5 Nm
- Screw cap 2 Nm
 Note
Note
- Check for ease of movement after installing the sun shade.
- Move the sun shade drive manually by the motor using a commercially available wrench and make sure there are no\ creases or folds in the sun shade material.
- Install the headliner. Refer to → Body Interior; Rep. Gr.70; Roof Trim Panels; Headliner, Removing and Installing.
- Install the rear glass panel. Refer to → Chapter "Rear Sunroof Panel, Removing and Installing".
- After completing the work procedure, perform an adaptation on the sun shade motor. Refer to → Chapter "Roof Shade Control Module - J394-, Programming".
Rear Frame, Removing and Installing
Removing
- Remove the assembly frame from the vehicle. Refer to → Chapter "Overview - Sunroof Frame".
- Remove the inner seal -2- from the assembly frame -1-.
- Remove the sunroof shade. Refer to → Chapter "Sunroof Shade, Removing and Installing".
- Loosen the wiring harness from the frame section.

- Remove the screws -3- from the frame -2- on the guide rail -1- .
- Mark the location -arrow- on the frame -3- for later assembly.
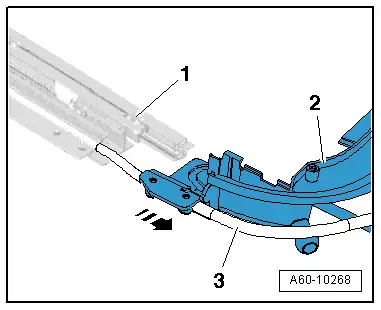
- Cut the bonded joint -2- between the guide rail -1- and the frame -3- using a knife.
- Pull the whole frame -2- and guide tubes -3- in the direction of the -arrow- out of the guide rails -1-.
Installing
- Remove any adhesive residue using Adhesive Strip Remover - VAS6349-.
- Clean the adhesive surfaces on the frame section and the guide rails with cleaning solution - D 009 401 04-.

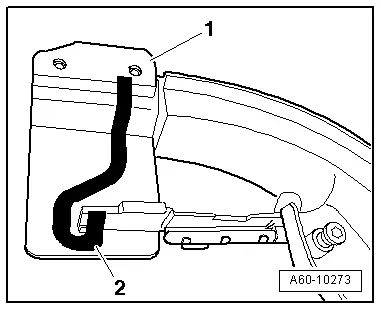
- Press Butyl Adhesive Sealing Cord - AKD 497 010 04 R10--2- with a 3.5 mm diameter into the sealing channel on the frame section -1- as shown.
- Slide the entire frame -2- and guide tubes -3- onto the guide rails -1- opposite the direction of -arrow-.
- Tighten the frame -1- screws -3- on the guide rails -2- to 2 Nm.
 Note
Note
Prior to installation, check the assembly frame for leaks.
- Seal the water drain hole -1-.
- Fill the area -3- between the frame -2- and the guide rails -4- with water.
- Wait at least 5 minutes and then check for leaks.
- Seal any leaks with Butyl Adhesive Sealing Cord - AKD 497 010 04 R10-.
- Install the sunroof shade. Refer to → Chapter "Sunroof Shade, Removing and Installing".
- Install the sunroof shade motor. Refer to → Chapter "Roof Shade Control Module - J394-, Removing and Installing".
- Install a new inner seal. Refer to → Chapter "Inner Seal, Replacing".
- Install the assembly frame. Refer to → Chapter "Overview - Sunroof Frame".
- Perform an adaptation on all sunroof motors after completing the procedure. Refer to → Chapter "Power Sunroof Control Module -J245-, Programming".