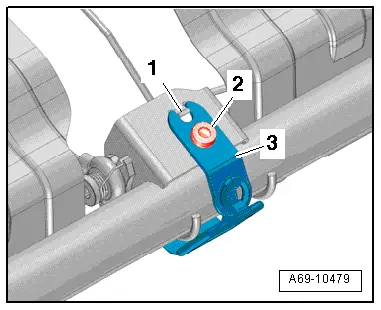
Audi Q5: Rear Seat Belt Guide, Removing and Installing
Outer Rear Belt Guide, Removing and Installing
Removing
 Caution
- When removing and installing the belt guide, do not remove the bolts installed in the belt guide from below. They are set by the manufacturer.
- Replace the entire belt guide if damaged.
- Remove the luggage compartment side trim. Refer to → Chapter "Luggage Compartment Side Trim Panel, Removing and Installing".
- Remove the rear sill trim. Refer to → Chapter "Sill Panel, Removing and Installing, Rear Sill Panel".
- Push the belt guide retaining hook -2- upward and hold it there.
- Slide the belt guide -1- back until the bolt heads -arrow- can be disengaged from the bracket on the body.
Installing
Install in reverse order of removal. Note the following:
- Insert the belt into the depression in the belt guide -1- and then place the belt guide on onto the bracket.
- Insert the belt guide with the bolt heads in the guides on the console.
- Press the belt guide down while pulling it forward. This engages the bolt heads in the guides.
- Pull the belt webbing forward until the retaining hooks engage audibly.
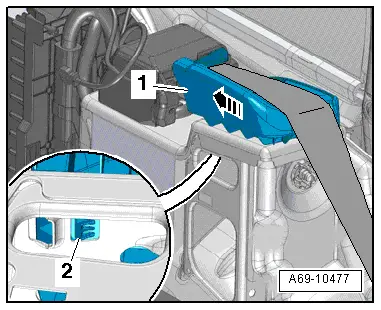
Rear Seat Belt Cover in Center Seating Position, Removing and Installing
Special tools and workshop equipment required
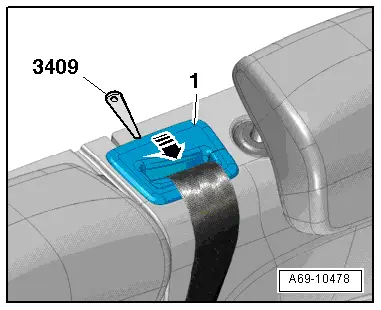
- Trim Removal Wedge -3409-
Removing
- Starting in the rear, unclip the seat belt guide cover -1- using the Trim Removal Wedge -3409--arrow-.
- Open the gap on the seat belt guide cover and remove the belt webbing.
Installing
Install in reverse order of removal.
Front Belt End Fitting, Removing and Installing
Removing
- Move the front seat all the way forward.
- Remove the lower B-pillar trim panel. Refer to → Chapter "B-Pillar Trim Panel, Removing and Installing, Lower B-Pillar Trim Panel".
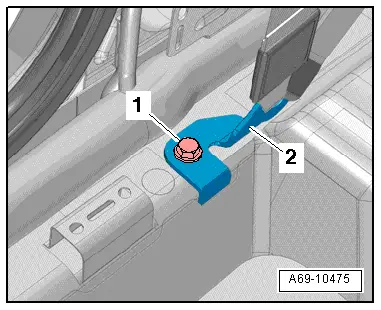
- Remove the bolt -1- and remove the belt end fitting -2-.
Installing
Install in reverse order of removal. Note the following:
- If parts of the seat belt system are removed due to an accident, replace the belt system mounting bolts.
Rear Outer Belt End Fitting, Removing and Installing
Removing
- Remove the rear seat. Refer to → Chapter "Rear Seat, Removing and Installing".
- Remove the rear sill trim. Refer to → Chapter "Sill Panel, Removing and Installing, Rear Sill Panel".
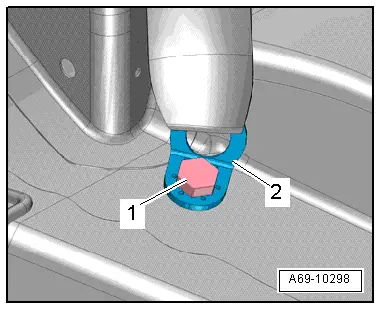
- Remove the bolt -1- and remove the belt end fitting -2-.
Installing
Install in reverse order of removal. Note the following:
- If parts of the seat belt system are removed due to an accident, replace the belt system mounting bolts.
- To position the belt end fitting properly, the opening that is on the bolting surface for this fitting must be positioned on top of the pin that is on the floor panel.
Rear Seat Belt Anchor in Center Seating Position, Removing and Installing
Removing
- Remove the left two third rear seat. Refer to → Chapter "Rear Seat, Removing and Installing".
- Remove the bolt -2- and then remove the belt end fitting -3-.
Installing
Install in reverse order of removal. Note the following:
- Replace the belt anchor bolt.
- If parts of the seat belt system are removed due to an accident, replace the belt system mounting bolts.
- Install the belt end fitting -3- so that the recess fits into the anti-twist mechanism -1- on the seat frame.
