Audi Q5: Lock Carrier Trim Panel, Removing and Installing
Lock Carrier Trim, Removing and Installing, Non-Hybrid Vehicles
Special tools and workshop equipment required
- Pry Lever -80 - 200-
- Omega Clip Tool -T40280-, is needed to remove any clips are that still inside the body.
Removing
- Remove the rear luggage compartment floor.
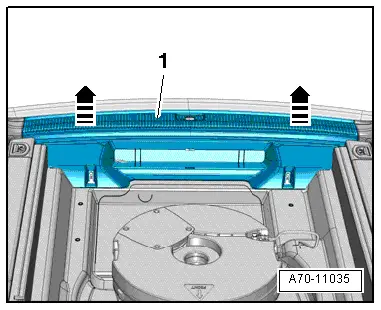
- Unclip the rear lid end trim panel -1- using the Pry Lever -80 - 200- diagonally upward -arrows-.
- Carefully remove the rear lid end trim panel upward and disconnect the connector for the rear lid closed sensor -G525-/-G526-.
Installing
Install in reverse order of removal. Note the following:
 Note
Note
- If the trim clamps remain in the body mounting points, remove them and insert them in the trim.
- Check clamps for damage or deformation, replace if necessary.
- Push on the rear cross panel trim until it engages audibly and stretch the lip of the rear lid seal over the rear cross panel trim.

Lock Carrier Trim, Removing and Installing, Hybrid Vehicles
Special tools and workshop equipment required
- Pry Lever -80 - 200-
- Omega Clip Tool -T40280-, is needed to remove any clips are that still inside the body.
Removing
 WARNING
The engine could start unexpectedly.
For general work performed on the high voltage system the ignition must be switched off and the key must be kept outside of the vehicle interior.
 DANGER!
High voltage components have hazardous voltage.
Note the following when working near high voltage components and high voltage cables:
- Cutting, deformed, and sharp edged tools or heat sources such as welding, solder, hot air and thermal glue are forbidden.
- Visually inspect the work area before working on high voltage components.
- Perform a visual inspection of the Electric Drive Power And Control Electronics -JX1-, the Electro-Drive Drive Motor -V141-, the A/C Compressor -V470- and the high voltage lines when working in the engine compartment.
- Visually inspect the high voltage cables and the covers when working on the underbody.
- Visually inspect the high voltage cables, the electronics and the High Voltage System Maintenance Connector -TW -, when working in the luggage compartment.
- Visually inspect all potential equalization cables.
Observe the following when performing the visual inspection:
- None of the components appear to have any external damage.
- The high voltage cable insulation and the potential equalization cable insulation are not damaged.
- The high voltage cables must not have any unusual deformations.
- Each high voltage component must be marked with a red warning label.
- Remove the luggage compartment floor panel, refer to → Chapter "Luggage Compartment Floor, Removing and Installing, Hybrid Vehicles".
- Unclip the rear lid end trim panel -1- using the Pry Lever -80 - 200- diagonally upward -arrows-.
- Carefully remove the rear lid end trim panel upward and disconnect the connector for the rear lid closed sensor Rear Lid -Closed- Sensor 1 -G525-/Rear Lid -Closed- Sensor 2 -G526-.
Installing
Install in reverse order of removal. Note the following:
 Note
Note
- If the trim clamps remain in the body mounting points, remove them and insert them in the trim.
- Check clamps for damage or deformation, replace if necessary.
- Push on the rear cross panel trim until it engages audibly and stretch the lip of the rear lid seal over the rear cross panel trim.
Tie Down, Removing and Installing
Removing
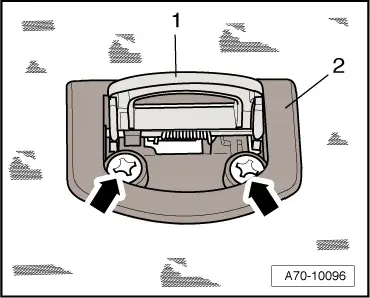
- Fold the tie-downs -1- upward.
- Remove screws -arrows- and remove tie-down mount -2-.
Installing
Install in reverse order of removal.
Coat Hooks, Removing and Installing
Special tools and workshop equipment required
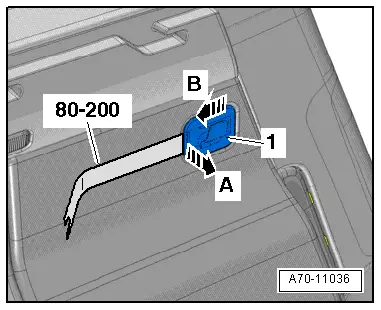
- Pry Lever -80 - 200-
Removing
- Lift the rear coat hook -1- slightly off the side trim panel using the Pry Lever -80 - 200--arrow A- and then pull it off toward the rear -arrow B-.
Installing
- Install the coat hook into the side trim panel and push it in until it audibly latches.