Audi Q5: Overview - Seat, Backrest and Headrest Adjustment Control Head
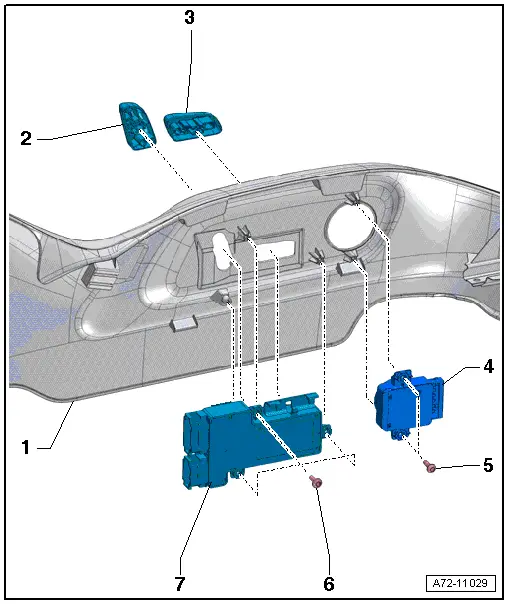
1 - Seat Side Sill Panel Trim
- Removing and installing. Refer to → Chapter "Sill Side Trim, Removing and Installing, Standard, Comfort Seat, Sport Seat Power Seats".
2 - Backrest Adjustment Actuator
- Clipped to the control head
- Removing and installing. Refer to → Chapter "Removing and Installing the Seat Adjustment Control Head".
3 - Actuator
- For seat adjustment
- Clipped to the control head
- Removing and installing. Refer to → Chapter "Removing and Installing the Seat Adjustment Control Head".
4 - Lumbar Support Adjustment Switch
- Driver side: Driver Seat Lumbar Support Adjustment Switch -E176-
- Front passenger side: Front Passenger Seat Lumbar Support Adjustment Switch -E177-
- Switch and operating knob cannot be separated
- Removing and installing. Refer to → Chapter "Driver/Front Passenger Seat Lumbar Support Adjustment Switch -E176-/-E177-, Removing and Installing".
5 - Bolt
- 1.3 Nm
- Quantity: 2
6 - Bolt
- 1.3 Nm
- Quantity: 3
7 - Seat Adjustment Control Head
- Driver side: Driver Seat Adjustment Control Head -E470- with:
- Driver Backrest Adjustment Switch -E96-
- Driver Seat Angle Adjustment Switch -E222-
- Driver Seat Forward/Back Adjustment Switch -E363-
- Driver Seat Height Adjustment Switch -E364-
- Front passenger side: Front Passenger Seat Adjustment Control Head
-E471- with:
- Front Passenger Seat Forward/Back Adjustment Switch -E64-
- Front Passenger Backrest Adjustment Switch -E98-
- Front Passenger Seat Angle Adjustment Button -E334-
- Front Passenger Seat Height Adjustment Switch -E365-
- Removing and installing. Refer to → Chapter "Removing and Installing the Seat Adjustment Control Head".
Overview - Spring Mat
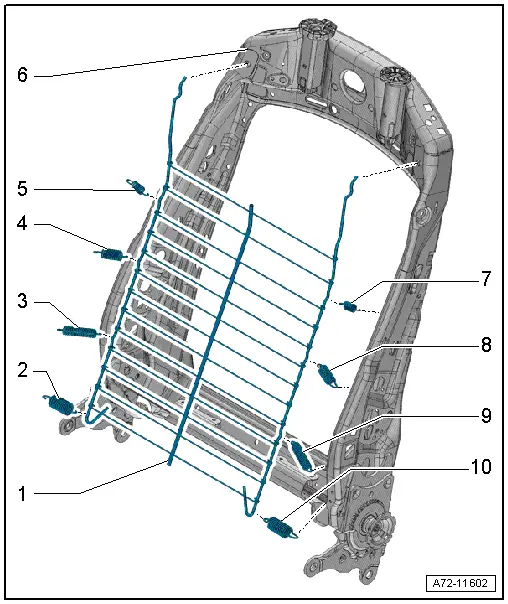
1 - Spring Mat
- Removing and installing. Refer to → Chapter "Spring Mat, Removing and Installing".
- Can be removed and installed with and without the pull-springs
2 - Bottom Spring
- Not available individually
3 - Center Spring
- Not available individually
4 - Center Spring
- Not available individually
5 - Upper Pull-Spring
- Not available individually
6 - Backrest Frame
7 - Upper Pull-Spring
- Not available individually
8 - Center Spring
- Not available individually
9 - Center Spring
- Not available individually
10 - Bottom Spring
- Not available individually
Pull-Spring Installation Position
The pull-springs shown in the assembly overview have different dimensions.
- Only engage the appropriate pull-spring in the location intended for it.
 Caution
Changing the locations of the pull-springs changes the cushioning quality of the upholstery.
Overview - Seat Height Adjuster
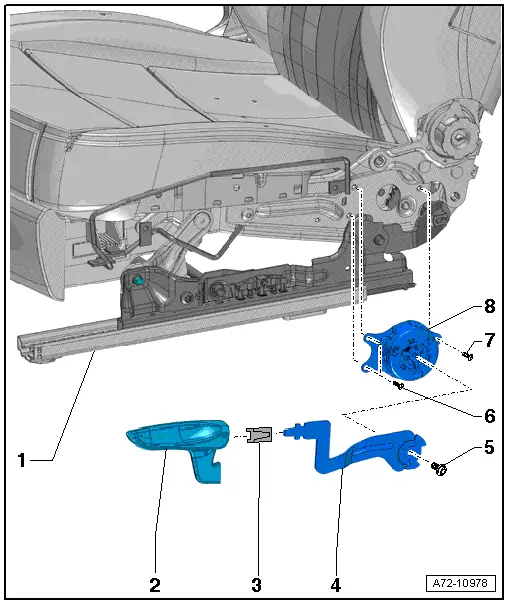
1 - Front Seat
- Manual
2 - Seat Height Adjustment Handle
- Removing and installing. Refer to → Chapter "Seat Height Adjuster, Removing and Installing".
3 - Clip
- Installed position.
4 - Lever
- For seat height adjustment handle
- Removing and installing. Refer to → Chapter "Seat Height Adjuster, Removing and Installing".
5 - Bolt
- 19.5 Nm
6 - Bolt
- 6 Nm
- Quantity: 2
7 - Bolt
- 6 Nm
8 - Seat Height Adjuster
- Removing and installing. Refer to → Chapter "Seat Height Adjuster, Removing and Installing".
Overview - Seat Angle Adjuster
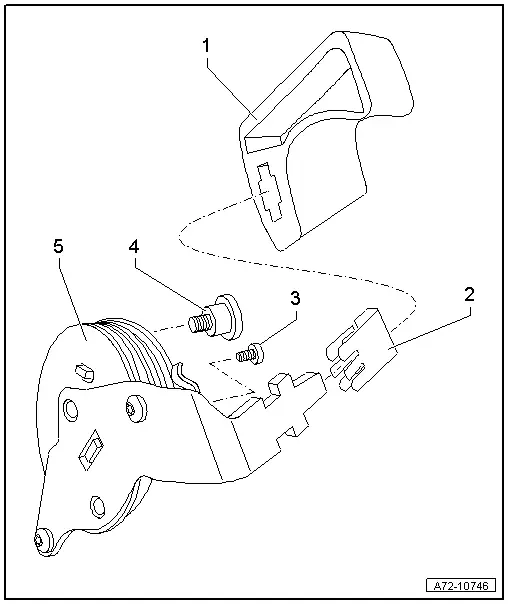
1 - Handle
- For seat inclination adjustment
- Removing and installing. Refer to → Chapter "Seat Angle Adjustment Handle, Removing and Installing".
2 - Clip
- Replace the seat angle adjustment handle each time it is removed
- Installed position
3 - Bolt
- 6.5 Nm
- Self-locking
- Always replace if removed
- Clean the threaded hole with a thread tap.
4 - Shoulder Pin
- 6 Nm
- Self-locking
- Always replace if removed
- Threaded hole for shoulder pin must be cleaned, for example, with thread cutter
5 - Seat Angle Adjustment
- Removing and installing. Refer to → Chapter "Seat Angle Adjuster, Removing and Installing".
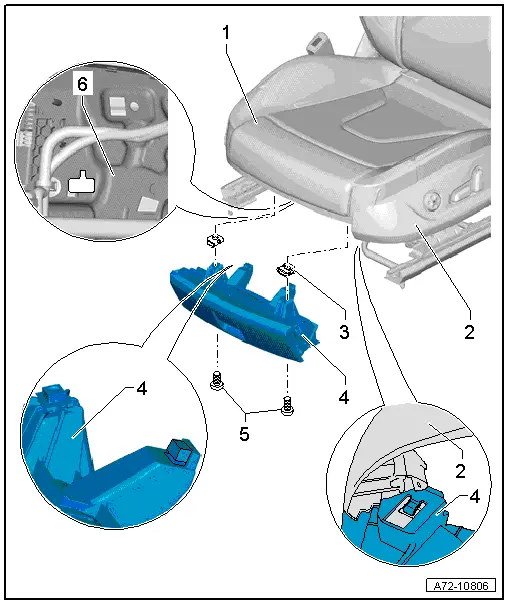
Overview - Seat Depth Adjuster
1 - Seat Depth Adjuster
- Removing and installing. Refer to → Chapter "Seat Depth Adjuster, Removing and Installing".
2 - Bolts
- 4 Nm
- Quantity: 2
- Self-tapping
- Always replace if removed
3 - Bushing
- Quantity: 2
4 - Bolts
- 4 Nm
- Quantity: 2
- Self-tapping
- Always replace if removed
5 - Base Plate
- For seat depth adjustment
- With handle and adjuster
6 - Handle
- With adjustment unit
7 - Trim
- Removing and installing. Refer to → Chapter "Seat Depth Adjustor Trim, Removing and Installing".
Overview - Lumbar Support
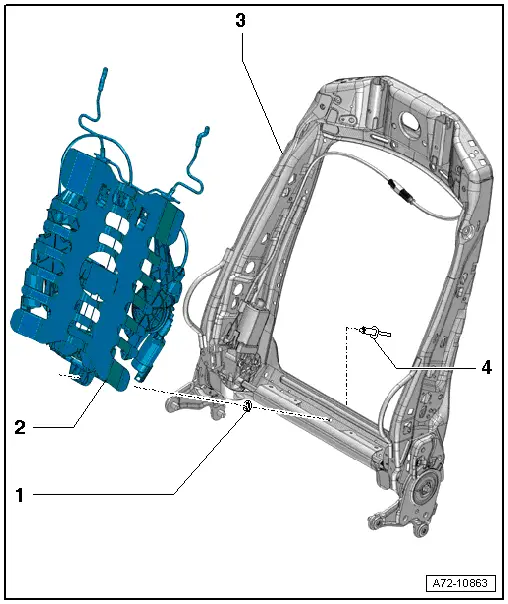
1 - Plastic Washer
- Insert in front of the four-way lumber support riveted connection between the lumbar support bracket and the backrest frame
2 - Lumbar Support
- Cannot be disassembled; available only as a complete unit. Refer to Parts Catalog
- Driver side:
- Driver Seat Lumbar Support Curvature Adjustment Motor -V125-
- Driver Seat Lumbar Support Height Adjustment Motor -V129-
- Front passenger side:
- Front Passenger Seat Lumbar Support Curvature Adjustment Motor -V126-
- Front Passenger Seat Lumbar Support Height Adjustment Motor -V130-
- Removing and installing. Refer to → Chapter "Lumbar Support Adjustment Motors -V125-/-V126-/-V129-/-V130-, Removing and Installing".
3 - Backrest Frame
4 - Rivet
Overview - Drawer
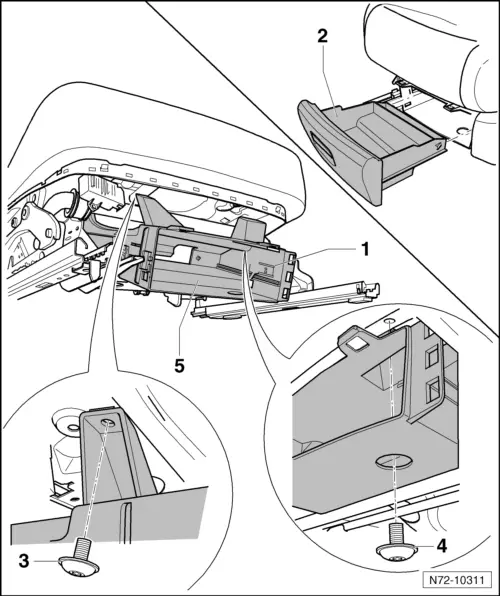
1 - Retaining Tab
2 - Drawer
- Versions with standard manual seat and folding passenger seat
3 - Bolt
- 8 Nm
4 - Bolt
- 8 Nm
5 - Mount
- For the drawer
- Removing and installing. Refer to → Chapter "Drawer Mount, Removing and Installing".
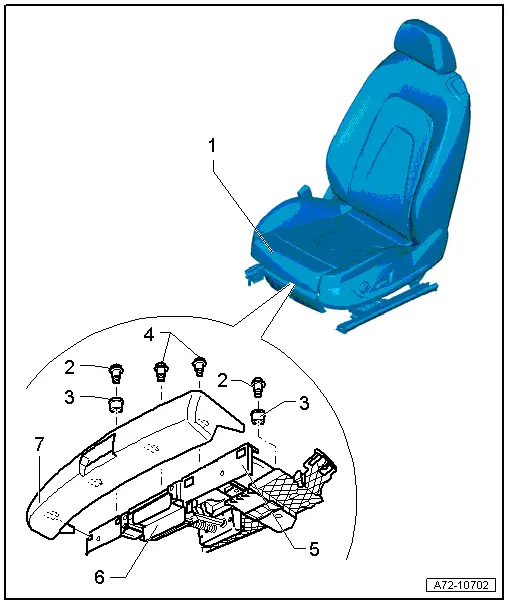
Overview - Storage Compartment
1 - Front Seat
2 - Seat Side Sill Panel Trim
3 - Spring Nut
- Quantity: 2
4 - Storage Compartment
- Various versions
- Removing and installing. Refer to → Chapter "Storage Compartment, Removing and Installing".
- Cannot be disassembled; available only as a complete unit. Refer to Parts Catalog
5 - Bolt
- 8 Nm
- Quantity: 2
6 - Upper Seat Frame

