Audi Q5: Instruments
Instrument cluster and controls
The instrument cluster is your central source of information.
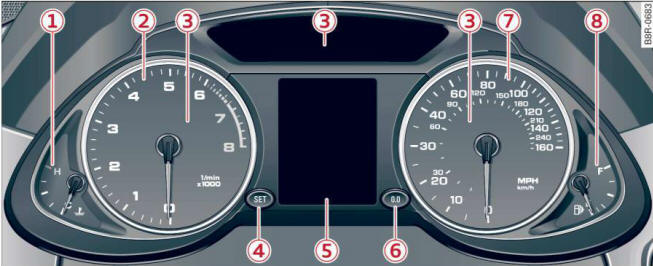
Fig. 3 Overview of the instrument cluster
Hybrid drive: the instrument cluster varies.
- Coolant temperature gauge
- Tachometer
- Warning/indicator lights
-
 button
 - Display
- Driver information system
- Time and date display
- Odometer
- Reset button for trip odometer
- Speedometer
- Fuel gauge
Tips
The illumination for the instrument cluster lights up whenever you switch on the ignition with the vehicle headlights off. As the daylight fades, the instrument cluster illumination likewise dims automatically and will go out completely when the outside light is very low. This feature is meant to remind you to switch on the headlights when outside light conditions become poor.
Engine coolant temperature gauge
The engine coolant gauge > fig. 3 1 only works when t he ignition is on. To prevent damage to your engine, please note the following important points:
Engine cold
If the needle is at or close to the bottom of the gauge, the engine has not yet reached its operating temperature. Avoid high engine speeds, heavy engine loads, and heavy throttle applications
Normal temperature
When the engine has reached its operating temperature,
the needle will move to the middle of
the gauge and remain there. If the engine is
working hard at high outside temperatures, the
needle may move higher on the gauge. This is not
a cause for concern as long as the
 warning
light in the instrument cluster display does not illuminate.
warning
light in the instrument cluster display does not illuminate.
Warning light in the instrument cluster display
If the
warning light in the instrument cluster
display flashes, this can mean one of two things:
either the coolant temperature is too high, or the
coolant level is too low.
If the needle is well in the upper area of the gauge, the coolant temperature is too high. Stop the vehicle, switch the engine off, and allow it to cool. If the warning light comes on again after driving a short distance, contact an authorized Audi dealer or other qualified workshop.
WARNING
- Always observe the warning before opening the hood and checking the engine coolant level.
- Never open the engine hood if you see or hear steam, or if you see engine coolant dripping from the engine compartment. You could burn yourself. Let the engine cool off first so that you cannot hear or see any steam or engine coolant.
Note
- Mounting additional lights or accessories in front of the air inlets reduces the cooling effect of the radiator. At high outside temperatures or high engine load, the engine could overheat.
- The front spoiler has been designed to properly distribute the cooling air when the vehicle is moving. If the spoiler is damaged, this could reduce the cooling effect and the engine could then overheat. Ask your authorized Audi dealer for assistance.
Tachometer (engine rev counter)
The tachometer indicates the engine RPM (revolutions per minutes).
If engine RPM drops below 1,500, you should downshift to the next lower gear. The red area at the end of the scale indicates maximum permissible engine RPM after the break-in period. Before reaching this area, move the selector lever to position D/S or ease your foot off the accelerator pedal.
Note
The tachometer needle 2 > fig. 3 should only briefly be in the red zone: you could damage your engine! The beginning of the red zone varies depending on the engine.
For the sake of the environment
Upshifting early saves fuel and reduces engine noise.
 button
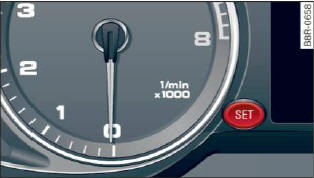
Fig. 4 SET button in the instrument cluster
The [set] button performs the following functions:
Switching on time, date, temperature display and odometer
The display appears for approximately 30 seconds when you press the set [set] button > fig. 4 with the ignition off.
Starting the Auto-Check sequence
The Auto-Check system constantly monitors certain individual functions and components of the vehicle when the ignition is turned on and when the vehicle is moving.
With the ignition turned on, you can start the "Auto-Check sequence" by pressing the [set] button. You can perform an Auto-Check sequence when the vehicle is stationary and the ignition is turned on or when the vehicle is moving slower than 3 mph (5 km/h).
The number of keys programmed to the vehicle is also displayed. The display L2 3/3 indicates that three keys have been programmed. This allows you to make sure you have received all of the keys when you purchase a used vehicle.
For example, if you only receive two keys, you should take those keys to your authorized Audi dealer to have the missing key deactivated so it cannot be used. You should also report the missing key to your insurance company.
Calling up the driver information
A yellow or red symbol appears in the instrument cluster display, usually with a driver message. The driver message display disappears after about 5 seconds. The driver message can be displayed again by briefly pressing the [set] button.
Setting the speed warning
By pressing the [set] button briefly, you can set threshold 1 of the speed warning while you are driving. By maintaining pressure on the [set] button, you delete the warning threshold.
Digital clock with date display
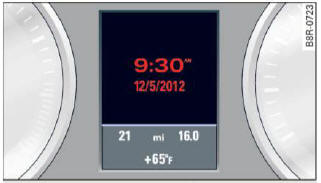
Fig. 5 Instrument cluster: time and date
Depending on the vehicle equipment level, you may choose between the quartz
clock or the CPS controlled clock  in
the radio or in the MMI.
in
the radio or in the MMI.
You can learn more about this in the MMI manual or in the radio user's manual.
Tips
- When you switch off the ignition or open the driver door, the time, date, odometer and temperature are displayed for an additional 30 seconds.
- You can also call up the display with the [set] button while the ignition is switched off.
Fuel gauge
The fuel gauge works only when the ignition is on.
When the needle reaches the reserve mark, the
 symbol appears in the instrument
cluster display as well as the message Please refuel. This message is meant to
remind
you to refuel.
symbol appears in the instrument
cluster display as well as the message Please refuel. This message is meant to
remind
you to refuel.
The total tank capacity of your vehicle is listed.
Note
Never run the tank completely dry! An irregular supply of fuel can cause engine misfiring and fuel could enter into the exhaust system. The catalytic converter could then overheat and be damaged.
Odometer
The odometer indicates the distance driven.
Fig. 6 Instrument cluster: odometer
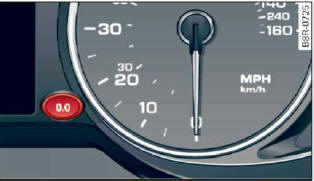
Fig. 7 Instrument cluster: reset button
The display of distance driven is shown in kilometers "km" or in "miles".
- USA models - Miles
- Canada models - Kilometers
You can switch from kilometers to miles or vise versa in the radio or in the MMI. You can learn more about this in the MMI manual or in the radio user's manual.
Odometer/trip odometer
The odometer shows the total number of kilometers or miles that have been driven on the vehicle.
The trip odometer shows the distance driven since it was last reset. It can be used to measure short distances. The last digit shows distances of 100 meters or 1/10 of a mile.
The trip odometer can be reset to zero by pressing the reset button
 > fig. 7.
Malfunction message
If there is a malfunction somewhere in the instrument cluster, dEF will appear in the trip odometer and will stay on. Contact your authorized Audi dealer to have the problem corrected.
Tips
- When you switch off the ignition or open the driver door, the time, date, odometer and temperature are displayed for an additional 30 seconds.
- You can also call up the display with the SET button while the ignition is switched off.

