Audi Q5: Guide Link, Removing and Installing
Special tools and workshop equipment required
- Engine and Gearbox Jack -VAS6931-
- Puller - Ball Joint -T40010A-
 Note
Note
During MY 2010, guide links with standard bonded rubber bushings were replaced by guide links with hydraulic bonded rubber bushings. Do not mix and match guide links on one axle. Both guide links must have the same type of bushing.
Removing
- Remove the wheel.
- Remove the noise insulation. Refer to → Body Exterior; Rep. Gr.66; Noise Insulation.
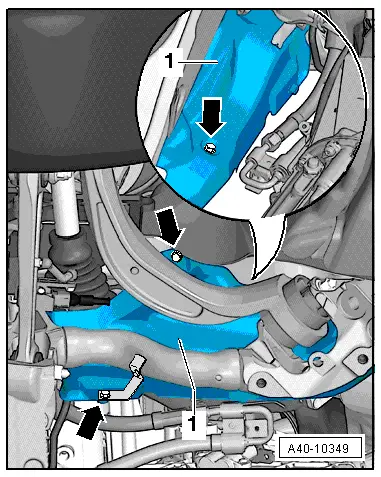
- Remove the bolts -arrows- and move the subframe shield -1- to the side, where applicable.
- Remove the nut from the guide link joint pins enough so it is flush with the joint pin threads. Counterhold the joint pins if necessary.
To protect thread, screw nut on pin a few turns.
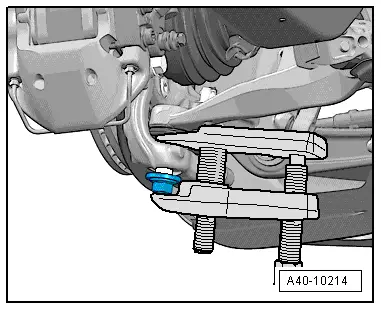
- Press the guide link joint pin off the conical seat using the Puller - Ball Joint -T40010A-.
 Note
Note
- Be careful not to damage CV boot in the process!
- Make sure that both puller lever arms are parallel to each other when using greatest force.
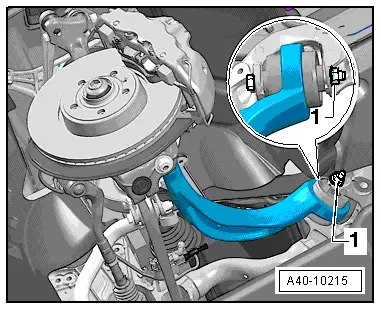
- Disconnect the threaded connection -1-.
- Remove guide link.
Installing
Install in reverse order of removal. Note the following:
Tightening specifications. Refer to → Chapter "Overview - Lower Control Arm and Ball Joint".
Tightening specifications. Refer to → Chapter "Overview - Subframe".
- Remove adhesive residue at stub thread of guide control arm.
 Note
Note
- Bonded rubber bushings have a limited range of motion. Only tighten suspension screws when vehicle is in curb weight or control position.
- Wheel bearing, lifting to curb weight position on vehicles with coil springs. Refer to → Chapter "Wheel Bearing in Curb Weight, Lifting Vehicles with Coil Spring".
- When tightening the threaded connection -1-, the guide link must be pressed toward the inside of the vehicle.
- Tighten the wheel. Refer to → Chapter "Wheel Bolt Tightening Specifications".
- An axle alignment may be required. Refer to → Chapter "Evaluating Need for Axle Alignment".

Guide Link Bonded Rubber Bushing, Removing and Installing
Guide Link Bonded Rubber Bushing, Removing and Installing, Standard Bonded Rubber Bushing 65 mm Diameter
Special tools and workshop equipment required
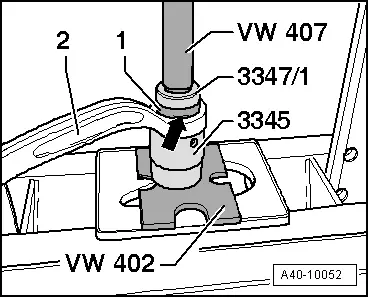
- Press Plate -VW402-
- Press Piece - Rod -VW407-
- Bearing Installer - Wheel Bearing -3345-
- Bearing Installer - Multiple Use - Assembly Tool -3347/1-
 Note
Note
Hold the guide link firmly in position while pressing bearing out and in.
Bearing, Removing
- Remove guide control arm. Refer to → Chapter "Guide Link, Removing and Installing".
- Mark the installation depth -arrow- on the bearing -1-.
Use a waterproof felt-tip pen.
- Install the special tools as shown in the illustration.
- Press bearing -1- out of guide link -2-.
Bearing, Installing
- Transfer the installation depth marking from the old bearing to the new one -arrow-.
- Lightly coat the bearing with Fitting Paste. Refer to the Parts Catalog.
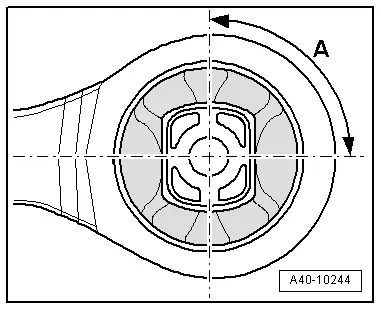
Mounting installation location
A = ~ 90º +- 5º

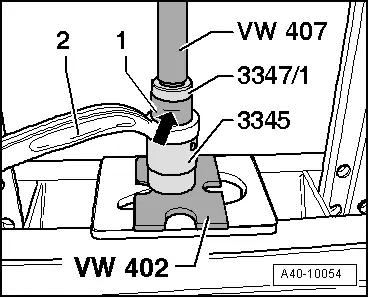
- Insert bearing -1- into guide control arm -2-, observe installation position when doing this.
- Install the special tools as shown in the illustration.
 Note
Note
When installing, make sure the bearing does not tilt.
- Press bearing -1- into guide control arm -2-.
- Note the installation depth marking when installing -arrow-.

- Check installation position of bearing -1- in guide control arm -2-.
A = ~ 90º +- 5º
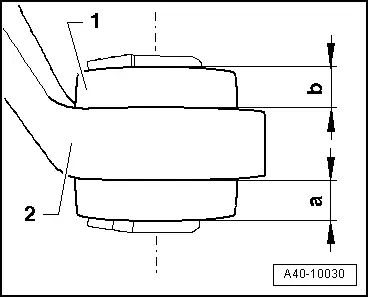
- Check rim offset of bearing -1- in guide control arm -2-.
Dimensions -a- and -b- must be identical.
- If dimensions -a- and -b- are different, press the bearing -1- in more.
- Install guide control arm. Refer to → Chapter "Guide Link, Removing and Installing".
Guide Link Bonded Rubber Bushing, Removing and Installing, Hydraulic Bonded Rubber Bushing 75 mm Diameter
Special tools and workshop equipment required
- Press Plate -VW402-
- Press Piece - Multiple Use -VW412-
- Press Piece - Split Tube -VW463/2-
- Bearing Installer - Wheel Bearing -3144-
- Shop Press -VAG1290A-
- Installation Lubricant (1:20 thinned with water). Refer to the Parts Catalog for the allocation.
Remove the hydraulic bonded rubber bushing
- The guide link is removed. Refer to → Chapter "Guide Link, Removing and Installing"
- Mark the installed position -arrow- on the hydraulic bonded rubber bushing -4-.
Use a waterproof marker.
- Order the special tools as illustrated.
1 - Workshop Press -VAG1290A- punch
2 - Press Piece - Multiple Use -VW412-
3 - Press Piece - Split Tube -VW463/2-
4 - hydraulic bonded rubber bushing
5 - Guide link
6 - Bearing Installer - Wheel Bearing -3144-
7 - Press Plate -VW402-
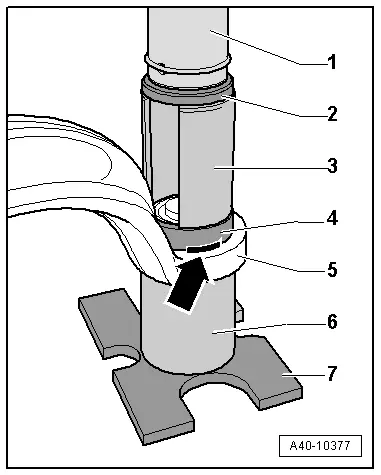
- Remove the hydraulic bonded rubber bushing -4- from the guide link -5-.
 Note
Note
Hold the guide link steady when removing/installing the hydraulic bonded rubber bushing.
Installing the hydraulic bonded rubber bushing
- Transfer the marking from the old hydraulic bonded rubber bushing to the new one.
- Lightly coat the new hydraulic bonded rubber bushing with installation lubricant. Refer to the Parts Catalog.
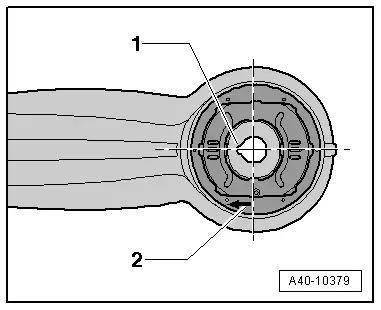
Installation position, hydraulic bonded rubber bushing
The notch -1- is on the steering axle and faces the inside of the guide link.
The arrow -2- faces the inside of the guide link.
- Install the hydraulic bonded rubber bushing -4- in the guide link -5- paying close attention to the installed position.
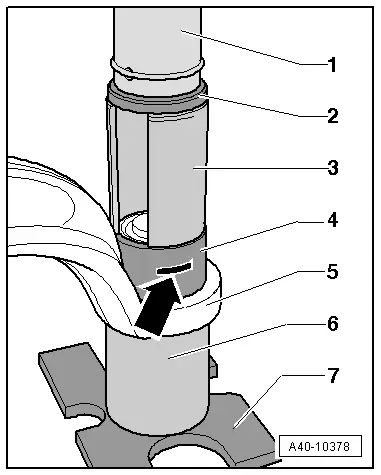
- Order the special tools as illustrated.
1 - Workshop Press -VAG1290A- punch
2 - Press Piece - Multiple Use -VW412-
3 - Press Piece - Split Tube -VW463/2-
4 - hydraulic bonded rubber bushing
5 - Guide link
6 - Bearing Installer - Wheel Bearing -3144-
7 - Press Plate -VW402-
 Note
Note
Do not tilt the hydraulic bonded rubber bushing when installing it.
- Install the hydraulic bonded rubber bushing -4- into the guide link -5-.
- Pay close attention to the marking -arrow-.
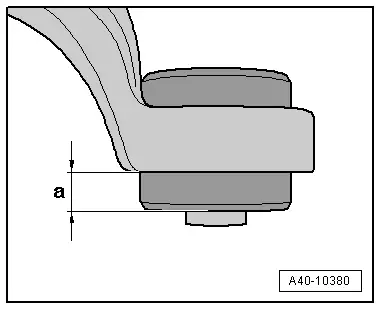
- Check the press-in depth -a- of the hydraulic bonded rubber bushing inside the guide link.
Dimension -a- = 18 mm.
- If dimension -a- is not reached, then press the hydraulic bonded rubber bushing again.
- Install the guide link. Refer to → Chapter "Guide Link, Removing and Installing".