Audi Q5: Exterior Rearview Mirror
Overview - Exterior Rearview Mirror
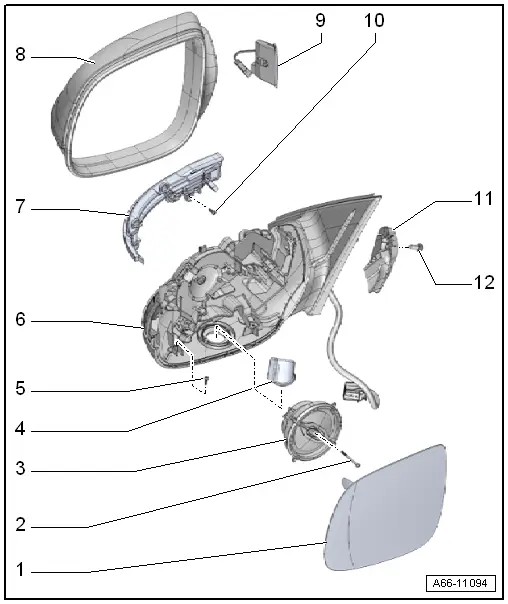
1 - Mirror Glass
- Removing and Installing. Refer to → Chapter "Mirror Glass, Removing and Installing".
2 - Bolt
- 1.5 Nm
3 - Mirror Adjusting Unit
- Removing and installing. Refer to → Chapter "Mirror Adjusting Unit, Removing and Installing".
4 - Entry Lamp Inside the Exterior Mirror
- Driver Entry Lamp in Exterior Rearview Mirror - W52-
- Front Passenger Entry Lamp in Exterior Rearview Mirror - W53-
- Removing and installing. Refer to → Electrical Equipment; Rep. Gr.94; Exterior Rearview Mirror Lamps; Exterior Rearview Mirror Entry Lamp, Removing and Installing.
5 - Bolt
- 1.5 Nm
- Quantity: 2
6 - Mirror Adjusting Unit Mount
- Removing and Installing. Refer to → Chapter "Exterior Rearview Mirror, Removing and Installing".
7 - Exterior Mirror Turn Signal Lamp
- Driver Exterior Mirror Turn Signal Lamp -L131-
- Front Passenger Exterior Rearview Mirror Turn Signal Bulb - L132-
- Removing and installing. Refer to → Electrical Equipment; Rep. Gr.94; Exterior Rearview Mirror Lamps; Driver/Front Passenger Exterior Rearview Mirror Turn Signal Bulb L131/L132, Removing and Installing.
8 - Exterior Rearview Mirror Housing
- Removing and Installing. Refer to → Chapter "Mirror Cap, Removing and Installing".
9 - Lane Change Assistance Warning Lamp inside the Exterior Mirror
- Lane Change Assistance Warning Lamp in Driver Exterior Rearview Mirror - K233-
- Lane Change Assistance Warning Lamp in Front Passenger Exterior Rearview Mirror - K234-
- Removing and installing. Refer to → Electrical Equipment; Rep. Gr.96; Lane Change Assistance; Lane Change Assistance Warning Lamp In Driver/Front Passenger Exterior Rearview Mirror K233/K234, Removing and Installing.
10 - Bolt
- Tightening specification. Refer to → Electrical Equipment; Rep. Gr.94; Exterior Rearview Mirror Lamps; Driver/Front Passenger Exterior Rearview Mirror Turn Signal Bulb L131/L132, Removing and Installing.
11 - Seal
- Push into the mirror adjustment unit mount
12 - Bolt
- 10 Nm
- Quantity: 3
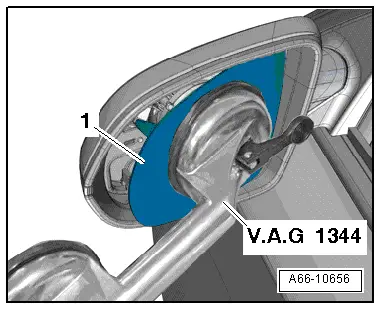
Mirror Glass, Removing and Installing
Special tools and workshop equipment required
- Double Suction Lifter -VAG1344-
- Protective gloves
Removing
 WARNING
Risk of injury.
Wear safety gloves
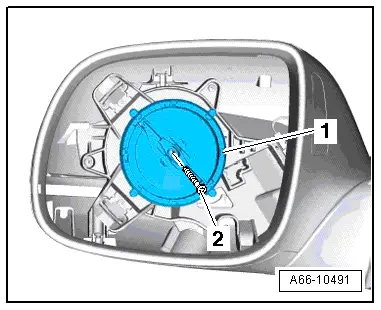
- Position the Double Suction Lifter -VAG1344- on the center of the mirror glass -1-, as illustrated.
- Remove the mirror glass from the mirror adjuster using the Double Suction Lifter - VAG1344-.
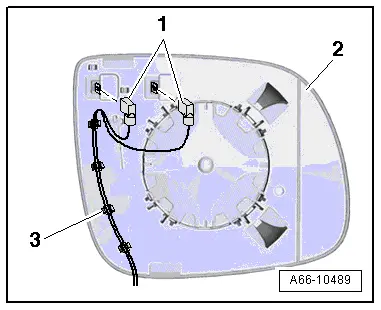
- Disconnect the -1- heated mirror electrical connectors on the back of the mirror glass -2-.
- Remove the connector from the bracket.
Installing
Install in reverse order of removal. Note the following:
- Press the wires into the clips -3-.
- Position the mirror glass on the mirror adjusting unit and press it on.
 Note
Note
Only press in the center of the mirror when pressing the mirror glass on.
Mirror Adjusting Unit, Removing and Installing
Removing
- Remove the mirror glass. Refer to → Chapter "Mirror Glass, Removing and Installing".
- Remove the bolt -2- for the mirror adjuster -1-.
- Disconnect the connector -2- on the mirror adjusting unit -1-.
Installing
- Press the mirror adjusting unit onto the mirror mount until it engages audibly.

Mirror Cap, Removing and Installing
Special tools and workshop equipment required
- T-Handle Hook -3438-
- Protective gloves
Removing
- Remove the mirror glass. Refer to → Chapter "Mirror Glass, Removing and Installing".
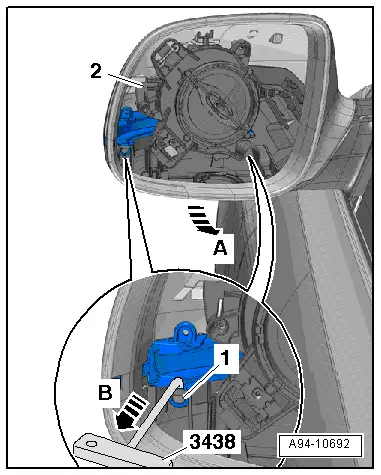
- Pull the exterior rearview mirror housing -2- in direction of -arrow A- just far enough until the tabs in the cover disengage.
- Release the left and right tabs -1--arrow B- using a T-Handle Hook - 3438- and remove the exterior rearview mirror housing from the cover.
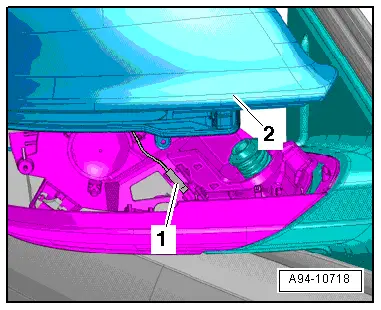
- Push the mirror adjuster downward and pull the exterior rearview mirror housing -2- slightly upward.
- If equipped, disconnect the connector from the lane change assistance warning lamp on the front of the mirror adjustment unit mount.
- Disconnect the connector -1- and remove the exterior rearview mirror housing.
Installing
Install in reverse order of removal. Note the following:
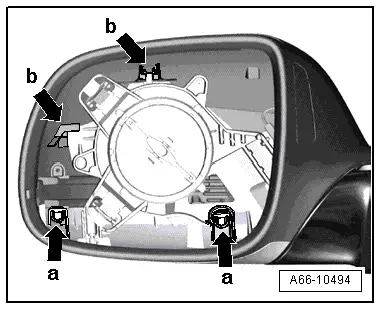
- Install the exterior rearview mirror housing. When doing this, make sure the guides slide correctly into the bracket -arrows b- so that the tabs -arrows a- lock into place.
- The front edge of the housing must engage with the bottom of the bracket.
- Install the mirror glass. Refer to → Chapter "Mirror Glass, Removing and Installing".
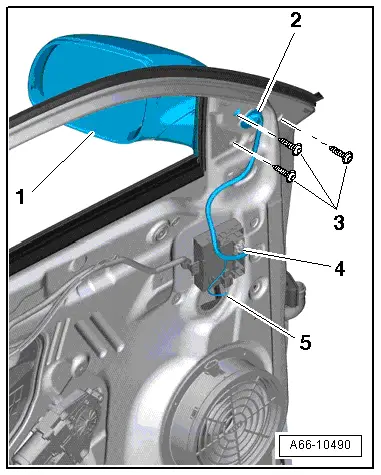
Exterior Rearview Mirror, Removing and Installing
Removing
- Remove the door trim panel. Refer to → Body Interior; Rep. Gr.70; Front Door Trim Panels; Front Door Trim Panel, Removing and Installing.
- Remove the speaker trim and speaker bracket for the treble speaker. Refer to → Body Interior; Rep. Gr.70; Front Door Trim Panels; Treble Speaker Trim, Removing and Installing.
- Disconnect the connectors -4- and -5-.
- Pry the grommet -2- out of the rearview mirror seal.
- Remove the retaining studs from the door in the exterior mirror area.
- Remove the bolts -3-.
- Remove the mirror adjusting unit mount -1- while guiding the wiring harness out through the body opening.
Installing
- Install the exterior rearview mirror seal .
- Remove the speaker bracket and speaker trim for the treble speaker. Refer to → Body Interior; Rep. Gr.70; Front Door Trim Panels; Treble Speaker Trim, Removing and Installing.
- Install the door trim panel. Refer to → Body Interior; Rep. Gr.70; Front Door Trim Panels; Front Door Trim Panel, Removing and Installing.