Audi Q5: Fog lights
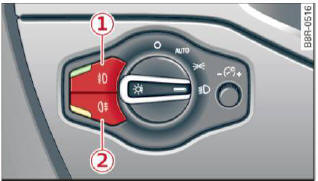
Fig. 47 Fog light switch
- To turn on the fog lights
 ,
press button 1
> fig. 47.
,
press button 1
> fig. 47. - To turn on the rear fog lights
 , press button 2.
Fog Lights
The side marker lights or low beams must be switched on. When the fog lights are switched on, the green check light at the edge of the switch comes on.
If automatic driving light control AUTO is activated, the low beams are switched on when the fog lights are turned on.
Rear fog lights
Low beams or side marker lights with fog lights must be turned on.
When the rear fog lights are turned on, the yellow check light at the edge of the switch comes on.
Note
The rear fog lights should only be turned on in accordance with traffic regulation, as the lights are bright for following traffic.
Adjusting exterior lighting
The functions are selected in the radio or in the MMI.
- Select:
 function button >
Exterior lighting. Or
function button >
Exterior lighting. Or - Select: function button >
Car systems
control button > Vehicle settings > Exterior
lighting.
Coming home (Lights when leaving car), Leaving home (Lights when unlocking car)
The coming home function illuminates the area outside the vehicle when you turn the ignition off and open the driver's door. Depending on vehicle equipment, the function can be switched on and off or the length of time the lights remain on can be adjusted.
The leaving home illuminates the area outside the vehicle when you unlock the vehicle. This function can be switched on and off.
The Coming home and Leaving home functions only operate when it is dark and the light switch is in the AUTO position.
Auto headlights
When the light switch is in the AUTO position, the switch-on point of the lights can be changed in the automatic driving light function.
Daytime running lights
USA models: You can switch the daytime running lights On and Off.
Canada models: The function cannot be turned off. It is activated automatically each time the ignition is switched on.
Travel mode (Canada models)
The headlight beam is asymmetrical. This provides stronger illumination on the side of the road on which you are driving. If you are driving in a country that drives on the opposite side of the road from your own country, this will cause glare for oncoming drivers. To prevent glare:
- Travel mode must be selected in vehicles with Xenon headlights.
- In vehicles with halogen headlights, certain areas of the headlight lenses must be covered with waterproof adhesive covers that prevent light from passing through. For more information, please see your authorized Audi dealer or authorized repair facility.
Tips
When travel mode is activated, a display in the driver information system indicates this each time you switch the ignition on.

