Audi Q5: Turn signal and high beam lever
Audi Q5 Type 8R (2008 - 2017) Owner's Manual / Operation / Lights and Vision / Turn signal and high beam lever
The lever on the left side of the steering column is used to operate the turn signals and the high beam as well as the headlight flasher.
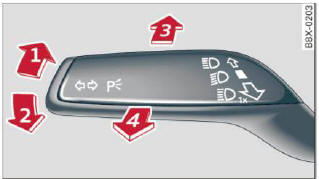
Fig. 50 Turn signal and high beam lever
The turn signal and high beam lever has the following functions:
Turn signals 
- Lift the lever up all the way > fig. 50 1 to use the right turn signals, or push the lever down all the way 2 to use the left turn signals.
Auto-blink
- Move the lever (up or down) just to the point of resistance to use the turn signals for as long as you need them, for example when changing lanes.
- Move the lever (up or down) just to the point of resistance and then release it right away to make the turn signals blink three times. You can use this feature for example when changing lanes on highways.
High beam 
- Push the lever forward 3 to switch on the high beam.
- Pull the lever back towards you to switch off the high beam.
Headlight flasher
- Pull the lever toward the steering wheel 4 to use the headlight flasher.
Notes on these features
- The turn signals only work with the ignition
turned on. The indicator lights
 or
or
 in the
instrument cluster also blink.
in the
instrument cluster also blink. - After you have turned a corner, the turn signal switches off automatically.
- The high beam works only when the headlights
are on. The indicator light
 in the instrument
cluster illuminates when the high beams are
on.
in the instrument
cluster illuminates when the high beams are
on. - The headlight flasher works only as long as you
hold the lever - even if there are no lights
turned on. The indicator light
in the instrument
cluster illuminates when you use the
headlight flasher.
WARNING
Do not use the high beam or headlight flasher if you know that these could blind oncoming traffic.

