Audi Q5: Emergency unlocking of the luggage compartment lid
Audi Q5 Type 8R (2008 - 2017) Owner's Manual / Operation / Opening and closing / Emergency unlocking of the luggage compartment lid
The luggage compartment lid can be released in an emergency from the inside.
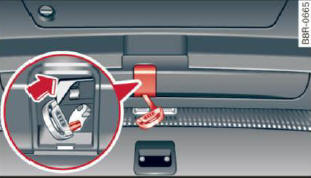
Fig. 38 Luggage compartment lid interior
The luggage compartment lid can be released in an emergency from inside the luggage compartment.
- Remove the cover from the luggage compartment lid.
- Press the lever in the direction of the arrow until the luggage compartment lid releases.
Child safety
Child safety locks in the rear doors
The child safety locks  prevent the rear doors
from opening from the inside.
prevent the rear doors
from opening from the inside.
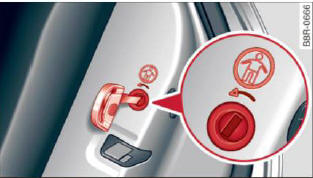
Fig. 39 Child safety locks on the rear doors
The rear doors are equipped with child safety locks. The lock is only visible when the door is open. Take the mechanical key out of the master key.
Switching the child safety locks on
- Turn the key in the direction of the arrow > fig. 39.
Switching the child safety locks off
- Turn the key in the opposite direction of the arrow.
When the child safety locks are activated, the inside door handles do not work and the doors can only be opened from the outside.

