Audi Q5: Power Windows
Controls
The driver can control all power windows.
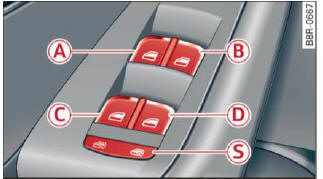
Fig. 40 Section of the driver's door: Controls
All power window switches are provided with a two-position function:
Opening the windows
- Press the switch to the first stop and hold it until the window reaches the desired position.
- Press the switch briefly to the second stop to automatically open the window.
Closing the windows
- Pull the switch to the first stop and hold it until the window reaches the desired position.
- Pull the switch briefly to the second stop to automatically close the window.
Power window switches
- Driver's door
- Passenger's door
- Left rear door
- Right rear door
- Safety button
Child safety locks
When the safety button S > fig. 40 is pressed,
the  symbol in the button lights
up. The power
window switches in the rear doors are switched
off.
symbol in the button lights
up. The power
window switches in the rear doors are switched
off.
WARNING
- When you leave your vehicle - even if only briefly - always remove the ignition key. This applies particularly when children remain in the vehicle. Otherwise the children could start the engine or operate electrical equipment (e.g. power windows). The power windows are functional until the driver's door or passenger's door has been opened.
- Pay close attention when closing the windows to prevent pinching of hands or limbs.
- When locking the vehicle from outside, the vehicle must be unoccupied since the windows can no longer be opened in an emergency.
Tips
After the ignition has been switched off, the windows can still be opened or closed for about 10 minutes. The power windows are not switched off until the driver's door or passenger's door has been opened.
Convenience opening/closing
The windows and the Panoramic sliding sunroof can be opened and closed with the mechanical key or the emergency key.
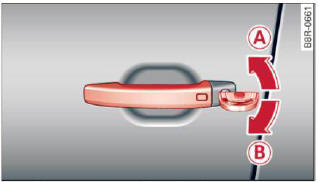
Fig. 41 Key turns for opening and closing
Convenience opening feature
- Use the emergency key or pull the mechanical key out of the master key.
- Insert the key into the lock of the driver's door.
- Turn the key to position > fig. 41 (A) until all the windows have reached the desired position and the Panoramic sliding sunroof is tilted.
Convenience closing feature
- Use the emergency key or pull the mechanical key out of the master key.
- Turn the key in the lock of the driver's door to the lock position (B) until the windows and the Panoramic sliding sunroof are closed.
When you open or close the Panoramic sliding sunroof, the power sunshade will also open or close.
WARNING
- Never close the windows and the Panoramic sliding sunroof inattentively and without checking - there is risk of injury.
- You must always watch when the windows
are being raised so that no one can be trapped.
If you release the key, the closing action is immediately canceled.
- Always read and heed WARNING.
Correcting window regulator malfunction
After disconnecting the vehicle battery, the onetouch up and down feature must be activated again.
- Pull and hold the power window switch until the window is completely closed.
- Release the switch.
- Pull the switch again for one second. The automatic closing/opening is now reactivated.

