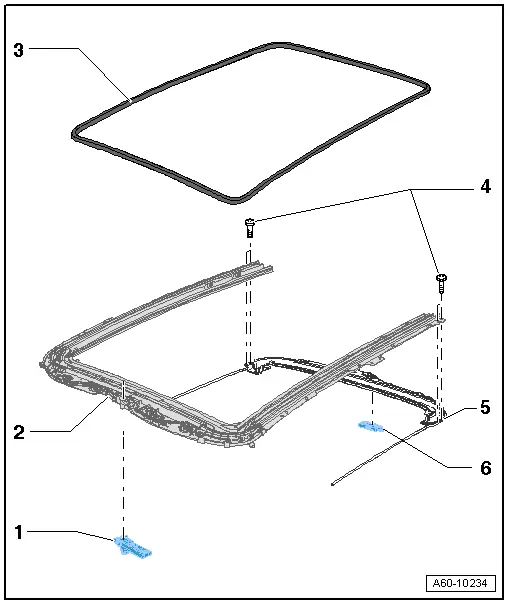
Audi Q5: Overview - Panorama Sunroof
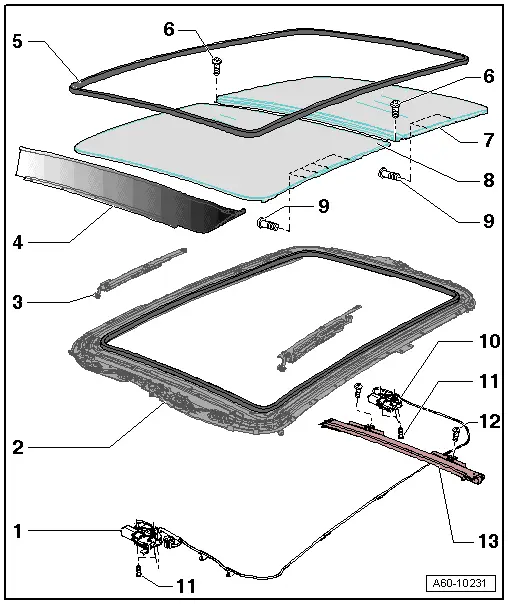
1 - Sunroof Motor
- Removing and installing. Refer to → Chapter "Power Sunroof Control Module -J245-, Removing and Installing".
- Adapting. Refer to → Chapter "Power Sunroof Control Module -J245-, Programming".
2 - Assembly Frame
- Overview. Refer to → Chapter "Overview - Sunroof Frame".
- Removing and installing. Refer to → Chapter "Overview - Sunroof Frame".
3 - Slotted Guide Rail
- Removing and installing. Refer to → Chapter "Front Glass Panel Slotted Guide Rail and Cable, Removing and Installing".
4 - Wind Deflector
- Removing and installing. Refer to → Chapter "Wind Deflector, Removing and Installing".
5 - Outer Seal
- Replacing. Refer to → Chapter "Outer Seal, Replacing and Installing".
6 - Bolt
- 4.5 Nm
7 - Rear Glass Panel
- Removing and installing. Refer to → Chapter "Rear Sunroof Panel, Removing and Installing".
- Adjusting. Refer to → Chapter "Sunroof Panel, Adjusting".
8 - Front Glass Panel
- Removing and installing. Refer to → Chapter "Sunroof Panel, Removing and Installing".
- Adjusting. Refer to → Chapter "Sunroof Panel, Adjusting".
9 - Bolt
- 4.5 Nm
10 - Sunroof Shade Motor
- Removing and installing. Refer to → Chapter "Roof Shade Control Module - J394-, Removing and Installing".
- Adapting. Refer to → Chapter "Roof Shade Control Module - J394-, Programming".
11 - Bolt
- 2 Nm
12 - Bolt
- 3.5 Nm
13 - Sunroof Shade
- Removing and installing. Refer to → Chapter "Sunroof Shade, Removing and Installing".
Overview - Sunroof Frame
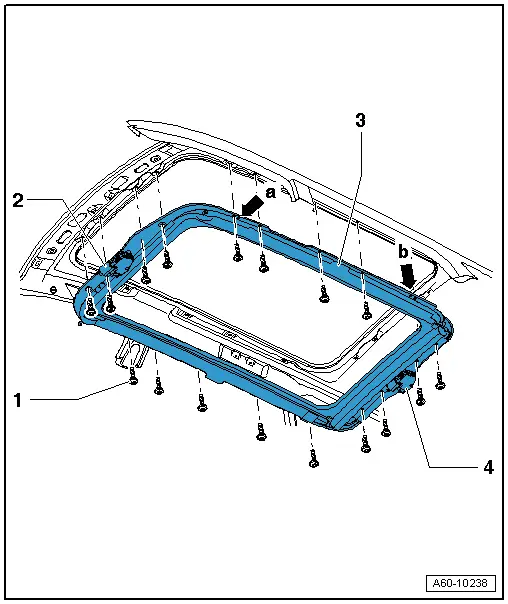
1 - Bolt
- 8 Nm.
 Caution
Follow the tightening sequence when installing.
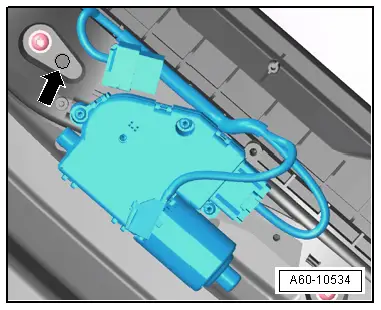
2 - Power Sunroof Control Module -J245-
3 - Assembly Frame
- Removing:
 Note
Note
Two persons are needed to remove and install the frame.
- Remove the headliner. Refer to → Body Interior; Rep. Gr.70; Roof Trim Panels; Headliner, Removing and Installing.
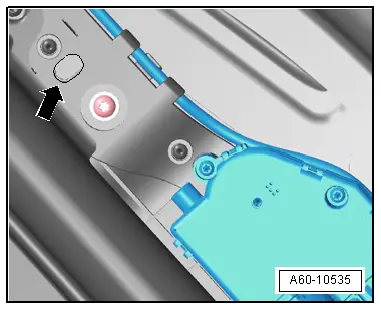
- Disconnect the water drain hoses from the connections -arrows- in the frame -3-.
- Disconnect the connector to the wiring harness at the Power Sunroof Control Module - J245--2- and Roof Shade Control Module - J394-.
- Remove the screws -1- from the frame -3- and with a second person, lift the frame out of the vehicle.
- Installing:
- Lift the frame into the vehicle and install the bolts -1- but do not tighten them.
- Center the frame on the centering holes.
- Tighten both outer front and rear screws to the tightening specification.
4 - Roof Shade Control Module -J394-
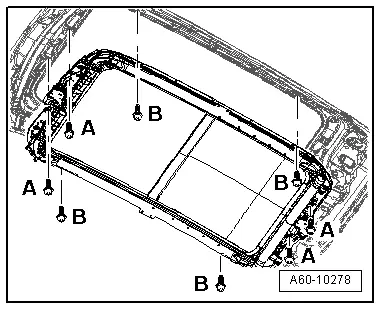
Frame Centering Holes
- Insert a 10 mm drill bit in the left front longitudinal holes -arrow- next to the Power Sunroof Control Module - J245- and...
- ...in the left rear longitudinal hole -arrow- next to the Roof Shade Control Module - J394-.
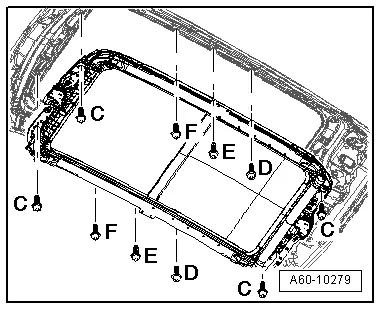
- Follow installation sequence.
Frame Attaching Sequence
 Note
Note
Always tighten the screws to the tightening specification following the specified sequence.
- First tighten the inner bolts -A- next to the front and rear motors.
- Then tighten the front and rear outer screws -B- likewise.
- Tighten the front and rear screws -C-.
- Tighten the bolts -D-; -E- and -F-.
Overview - Rear Frame Section
1 - Front Motor Support
- Removing and installing. Refer to → Chapter "Front Glass Panel Slotted Guide Rail and Cable, Removing and Installing".
2 - Assembly Frame
3 - Inner Seal
- Replacing. Refer to → Chapter "Inner Seal, Replacing".
4 - Bolt
- 2 Nm
5 - Rear Frame
- Removing and installing. Refer to → Chapter "Rear Frame, Removing and Installing".
6 - Rear Motor Support
- Removing and installing. Refer to → Chapter "Rear Motor Support and Sun Shade Cable, Removing and Installing".

