Audi Q5: Overview - Front Brakes
Overview - Front Brakes, 1LA, 1LJ, 1ZB and 1ZT
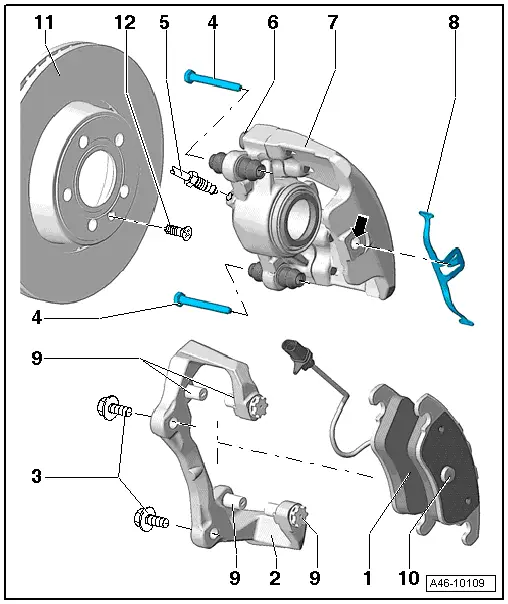
1 - Brake Pads
- Illustration of left front with brake wear cable
 Note
Note
The inner surface (with tension spring) in the left brake caliper is equipped with a cable for wear indicator.
- Allocation. Refer to the Parts Catalog.
- Check the brake pad thickness.
- Wear limit.
- Always replace on both axles.
- Before installing the brake pads, clean the pad guide surface and coat it with a film of grease. Grease. Refer to Parts Catalog.
- Before installing new brake pads, thoroughly clean the brake calipers of contaminants (grease-free). When doing this, pay particular attention to the cleanliness of the brake pad contact surfaces.
2 - Brake Carrier
- Bolt to wheel bearing housing
- The retaining pins for the brake pads on the brake carrier must not be loosened under any circumstances.
3 - Bolt
- 196 Nm
- Brake carrier to wheel bearing housing
- Replace after removing
4 - Bolt
- 30 Nm
- Tighten the brake caliper to the brake carrier.
5 - Brake Hose
- 20 Nm
 Note
Note
Do not twist it when installing
6 - Bolt
- The four bolts must not be loosened under any circumstances.
7 - Brake Caliper
- Do not loosen any screws on the brake caliper.
8 - Spring Clamp
- Remove the brake pads before removal
- Insert after installing the brake pads
9 - Brake Pad Retaining Pins
- Do not loosen
 Caution
The four retaining pins for the brake pads on the brake carrier must not be loosened under any circumstances.
 Note
Note
Clean and lubricate before installing brake pads. Grease. Refer to Parts Catalog.
10 - Securing the Brake Pad in the Brake Caliper
11 - Brake Rotor
- Allocation. Refer to the Parts Catalog.
- Wear limit. Refer to → Chapter "Front Brakes".
- Always replace on both axles.
- Refer to → Chapter "Brake Rotor, Brake 1LA/1LJ/1ZB/1ZT, Removing and Installing"
- Clean and lubricate contact surfaces between brake rotor and wheel hub. Grease. Refer to Parts Catalog.
12 - Brake Pad Bolt
- 5 Nm
Overview - Front Brakes, 1LB, 1LC, 1LE and 1LP
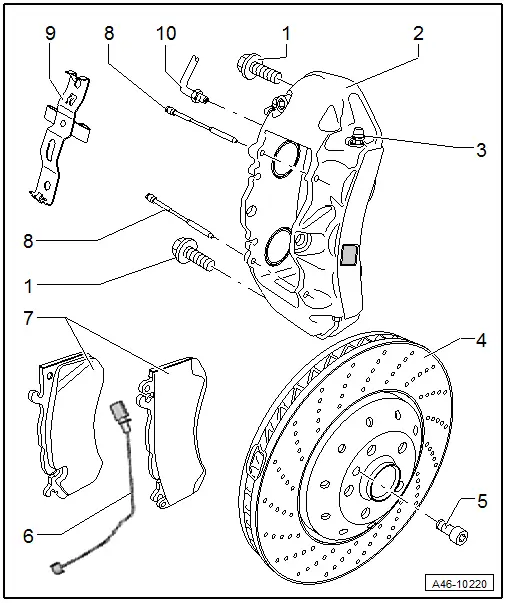
1 - Bolt
- 196 Nm
- Replace after removing
 Note
Note
Loosen only the coil spring bolts
2 - Brake Caliper
- Do not loosen any screws on the brake caliper.
 Note
Note
Depending on the model there are two dampers installed in each front brake caliper.
3 - Bleed Screw
4 - Brake Rotor
- Allocation. Refer to the Parts Catalog.
- Always replace on both axles.
- Wear limit. Refer to → Chapter "Front Brakes".
- Clean and lubricate contact surfaces between brake rotor and wheel hub. Grease. Refer to Parts Catalog.
5 - Bolt
- 10 Nm
- Brake rotor to wheel hub
6 - Brake Pad Wear Wire
- On inner brake pad
7 - Brake Pads
- With the brake pad wear wire on the inside of the brake pad
- Check the brake pad thickness.
- Wear limit.
- Before installing the brake pads, clean the pad guide surface and coat it with a film of grease. Grease. Refer to Parts Catalog.
- Make sure it is installed in the correct position.
8 - Brake Pad Pins
- Make sure it is installed in the correct position.
- Press all the way from the inside toward the outside
9 - Brake Pad Spring
- Make sure it is installed in the correct position.
10 - Brake Line Hose
- 19 Nm
 Note
Note
Do not loosen when changing brake pads
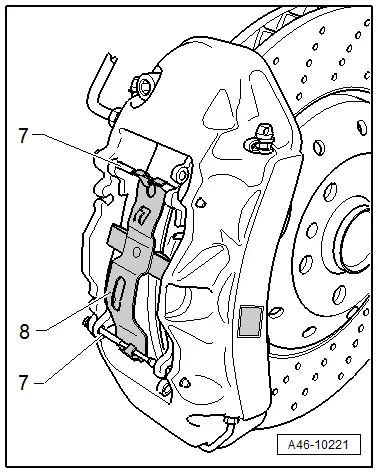
Installed position for the brake pad spring brake pad pin -7-, brake pad pin -8-.
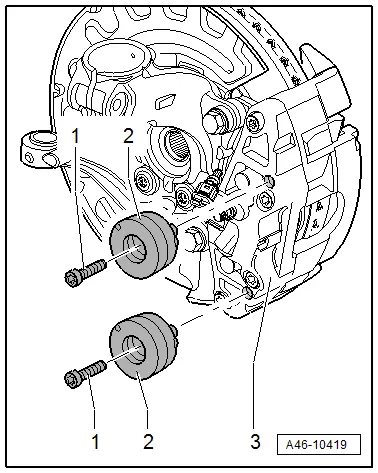
Brake Caliper Balance Weight
Depending on the model there are two dampers installed in each front brake caliper.
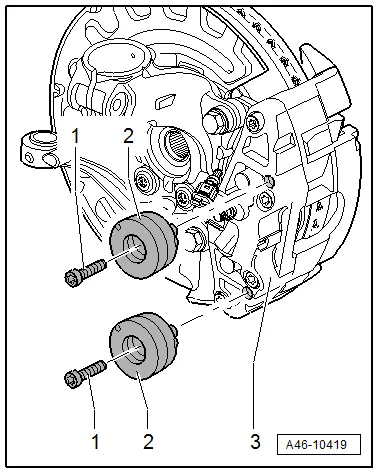
1 - Bolt
- 10 Nm
- Always replace if removed
2 - Vibration Damper
- Installed twice in each front brake caliper.
3 - Brake Caliper
Damper, Removing and Installing
Depending on the model there are two dampers installed in each front brake caliper.
Removing
- Remove the dust cap if equipped.
- Remove the bolt -1-.
- Remove the vibration damper -2- from the brake caliper -3-.
Installing
- Clean the brake caliper around the balance weight.
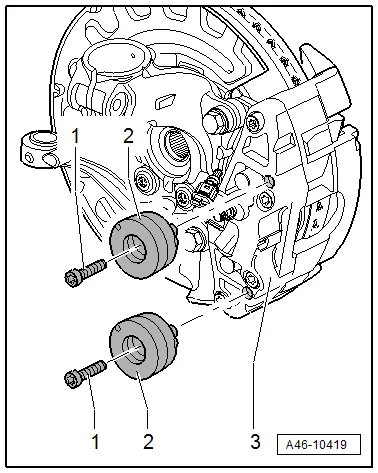
- Install the damper -2- in the brake caliper.
- Install the new bolts -1- and tighten -item 1-.
- Replace the existing protective cap.
Overview - Front Brakes, 1LV and 1ZK, SQ5
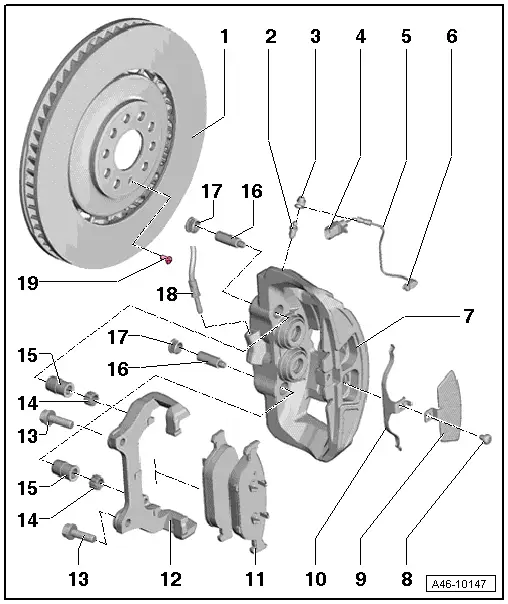
1 - Brake Rotor
- Allocation. Refer to the Parts Catalog.
- Wear limit. Refer to → Chapter "Front Brakes".
- Always replace on both axles.
- Remove brake carrier before removing
- Clean and lubricate contact surfaces between brake rotor and wheel hub. Grease. Refer to Parts Catalog.
2 - Bleed Screw
- 10 Nm
3 - Cap
4 - Connector, Brake Pad Wear Display Wire
5 - Brake Pad Wear Display Wire
 Note
Note
Make sure the contact for the brake pad wear display fits correctly in the spring inside the inner brake pad.
6 - Wire for the Brake Pad Wear Display in the Brake Pad
 Note
Note
Make sure the contact for the brake pad wear display fits correctly in the spring inside the inner brake pad.
7 - Brake Caliper
- Do not loosen any screws on the brake caliper.
 Note
Note
Depending on the model there are two dampers installed in each front brake caliper.
8 - Bolt
- 22 Nm
9 - Trim
 Note
Note
- Make sure the cover and balance spring are installed correctly.
- The tips of the balance spring fit into the brake caliper.
- The tip of the balance spring fits under the cover.
10 - Balance Spring
 Note
Note
- Make sure the cover and balance spring are installed correctly.
- The tips of the balance spring fit into the brake caliper.
- The tip of the balance spring fits under the cover.
11 - Brake Pads
 Note
Note
The inner pad is equipped with a cable for the wear indicator.
- Check the brake pad thickness.
- Wear limit.
- Remove any film on the back of the pad before installing.
- Before installing the brake pads, clean the pad guide surface and coat it with a film of grease. Grease. Refer to Parts Catalog.
- Always replace on both axles.
 Note
Note
- Before installing new brake pads, thoroughly clean the brake calipers of contaminants (grease-free). When doing so, pay particular attention to removing any remaining adhesive foil on outer brake pad contact surfaces.
- Make sure the contact for the brake pad wear display fits correctly in the spring inside the inner brake pad.
12 - Brake Carrier
- Bolt to wheel bearing housing
13 - Bolts
- 196 Nm
- Replace after removing
14 - Guide Pins
15 - Guide Pin Seal
16 - Guide Pin
- 55 Nm
- Seal with a cap
 Note
Note
Use Socket - Xzn 9 -T50036-.
17 - Cap
18 - Brake Hose
- Install in the brake caliper housing
- Hose must be installed free of twists
- Make sure that lugs are properly seated in grooves in bracket.
- Brake line connection to brake hose 14 Nm
- Brake line connection to brake caliper 20 Nm
Make sure the brake hose is routed correctly. Make sure the brake hose is not blocked, bent or rubbing against the vehicle.
19 - Bolt
- 9 Nm
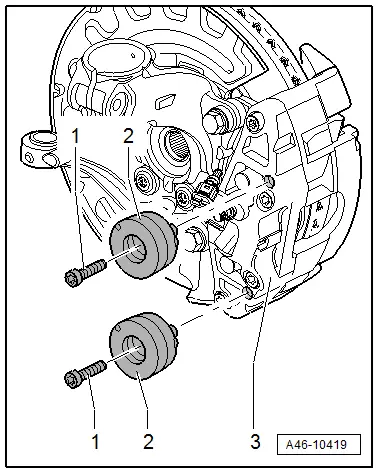
Brake Caliper Balance Weight
Depending on the model there are two dampers installed in each front brake caliper.
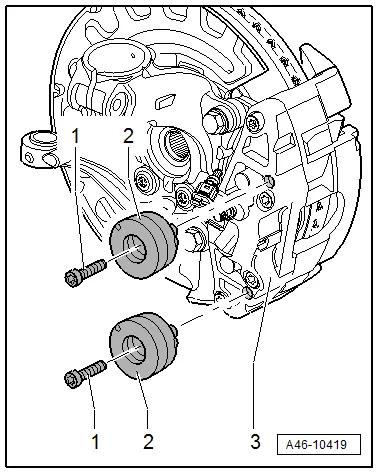
1 - Bolt
- 10 Nm
- Always replace if removed
2 - Vibration Damper
- Installed twice in each front brake caliper.
3 - Brake Caliper
Balance Weight, Removing and Installing
Depending on the model there are two dampers installed in each front brake caliper.
Removing
- Remove the dust cap if equipped.
- Remove the bolt -1-.
- Remove the vibration damper -2- from the brake caliper -3-.
Installing
- Clean the brake caliper around the balance weight.
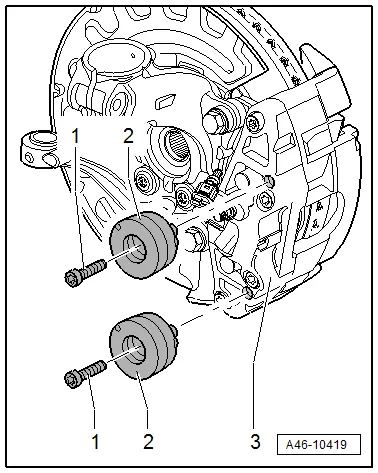
- Install the damper -2- in the brake caliper.
- Install the new bolts and tighten.
- Replace the existing protective cap.
