Audi Q5: Head restraints
Front head restraints
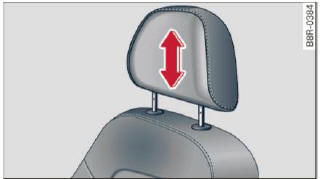
Fig. 68 Front seats head restraints: adjusting the height
The head restraints on the front seats can be adjusted to provide safe support to head and neck at the optimum height. When optimally adjusted, the top of the restraint should be level with the top of the head. If that is not possible, try to adjust the head restraint so that it is as close to this position as possible.
- Grasp the sides of the head restraint with both hands and slide it upward/downward until you feel it click into place > fig. 68.
Refer to > Proper adjustment of head restraints for guidelines on how to adjust the height of the front head restraints to suit the occupant's body size.
WARNING
- Driving without head restraints or with head restraints that are not properly adjusted increases the risk of serious or fatal neck injury dramatically.
- Read and heed all WARNINGS > Proper adjustment of head restraints.
Tips
Correctly adjusted head restraints and safety belts are an extremely effective combination of safety features.
Rear head restraints
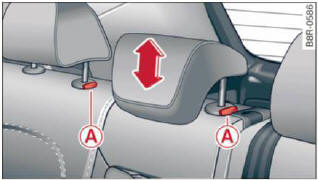
Fig. 69 Rear seat: head restraints
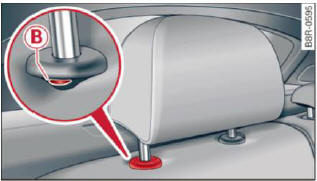
Fig. 70 Rear seat: outer head restraint
If there is a passenger on the rear center seating position, slide the center head restraint upward at least to the next notch.
Adjusting the head restraints
- To move the head restraint up, hold it at the sides with both hands and slide it upward until you feel it click into place.
- To move the head restraint down, press the button (A) and slide the head restraint downward.
Removing the outer head restraints
Fold the backrest forward.
- Move the head restraint upward as far as it can go.
- Press the release B > fig. 70 with the mechanical
key and the button A > fig. 69.
Pull the head restraint out of the backrest at the same time.
Installing the outer head restraints
- Slide the posts on the head restraint down into the guides until you feel the posts click into place.
- Press the button A > fig. 69 and slide the head restraint all the way down. You should not be able to pull the head restraint out of the backrest.
Removing the center head restraint
- Move the head restraint upward as far as it can go.
- Press the button (A) > fig. 69 and pull the head restraint out of the backrest.
Installing the center head restraint
- Slide the posts on the head restraint down into the guides until you feel the posts click into place.
- Press the button (A) > fig. 69 and slide the head restraint all the way down. You should not be able to pull the head restraint out of the backrest.
So that the driver can have a better view to the rear, the head restraints should be pushed down completely when the rear seats are not occupied.
WARNING
- Only remove the rear seat head restraints when necessary in order to install a child seat. Install the head restraint again immediately once the child seat is removed. Driving without head restraints or with head restraints that are not properly adjusted increases the risk of serious or fatal neck injury dramatically.
- Read and heed all WARNINGS > Proper adjustment of head restraints.
Tips
Correctly adjusted head restraints and safety belts are an extremely effective combination of safety features.

