Audi Q5: Component Location Overview - Passenger Compartment Trim
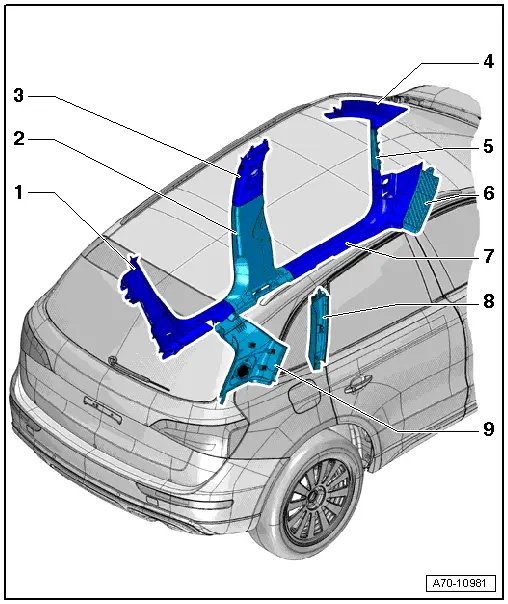
1 - Rear Sill Panel Trim
- Overview. Refer to → Chapter "Overview - Sill Panel Strip, Rear Sill Panel Strip".
2 - Lower B-Pillar Trim Panel
- Overview. Refer to → Chapter "Overview - B-Pillar Trim Panel".
3 - Upper B-Pillar Trim Panel
- Overview. Refer to → Chapter "Overview - B-Pillar Trim Panel".
4 - Upper A-Pillar Trim Panel
- Overview. Refer to → Chapter "Overview - A-Pillar Trim Panel".
5 - A-Pillar Gap Cover
- Overview. Refer to → Chapter "Overview - Sill Panel Strip, Front Sill Panel Strip".
6 - Footrest/Floor Covering
- Overview. Refer to → Chapter "Overview - Foot Rest and Carpet".
7 - Front Sill Panel Trim
- Overview. Refer to → Chapter "Overview - Sill Panel Strip, Front Sill Panel Strip".
8 - C-pillar Trim
- Overview. Refer to → Chapter "Overview - C-Pillar Trim Panel".
9 - D-Pillar Trim
- Overview. Refer to → Chapter "Overview - D-Pillar Trim Panel".
Overview - Sill Panel Strip
Overview - Sill Panel Strip, Front Sill Panel Strip
 Note
Note
The driver side sill panel is shown in the illustration.
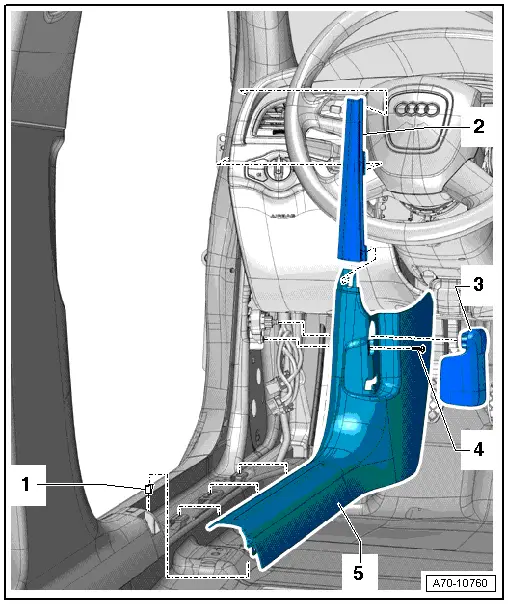
1 - Bracket
- Quantity: 4
- Insert in the trim panel
- Remove any clips still in the body using Omega Clip Tool -T40280- and insert them into the sill panel strip for installation.
- Replace if damaged or deformed
2 - A-Pillar Gap Cover
- Removing and installing. Refer to → Chapter "Sill Panel Strip, Removing and Installing, Front Sill Panel".
3 - Release Lever
- For the cable
- Driver side only
- Removing and installing. Refer to → Body Exterior; Rep. Gr.55; Hood; Hood Release Lever, Removing and Installing.
4 - Bolt
- 2.5 Nm
- Driver side only
5 - Front Sill Panel Trim
- Removing and installing. Refer to → Chapter "Sill Panel Strip, Removing and Installing, Front Sill Panel".
Overview - Sill Panel Strip, Rear Sill Panel Strip
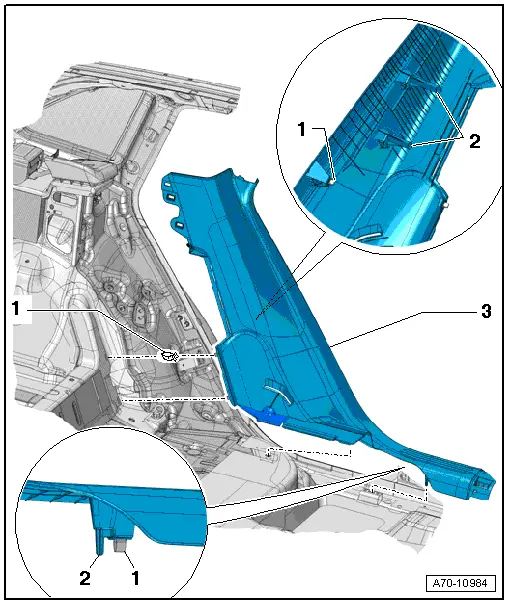
1 - Bracket
- Insert in the sill panel strip
- Quantity: 5
- Replace if damaged or deformed
- Remove the clips that are still in the mounting points on the body using the Omega Clip Tool -T40280-.
2 - Centering Pins
3 - Rear Sill Panel Trim
- Equipment levels
- Rear driver side with Driver Side Rear Thorax Airbag Igniter -N201-
- Rear passenger side with Passenger Side Rear Thorax Airbag Igniter -N202-
- Removing and installing. Refer to → Chapter "Sill Panel, Removing and Installing, Rear Sill Panel".
Overview - A-Pillar Trim Panel
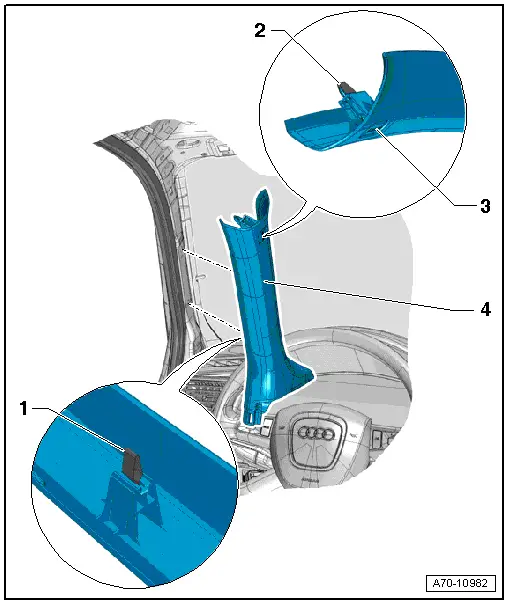
1 - Bracket
- Quantity: 2
- Replacing
- Insert in the trim panel
- There are different versions, refer to → Fig. "Upper A-Pillar Trim Clip".
2 - Expanding Clip
3 - Expanding Cap
- With the "Airbag" symbol
- Carefully unclip
4 - Upper A-Pillar Trim Panel
- Removing and installing. Refer to → Chapter "A-Pillar Trim Panel, Removing and Installing".
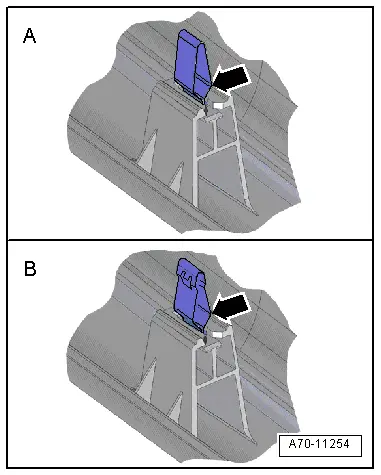
Upper A-Pillar Trim Clip
There are different versions of the clips used for attaching the A-pillar trim depending on the date of manufacture:
Version A:
Clips without a hook -arrow-
- In the center and/or at the bottom on the trim.
Version B:
Clips with a hook -arrow-
- In the center and/or at the bottom on the trim.
Overview - B-Pillar Trim Panel
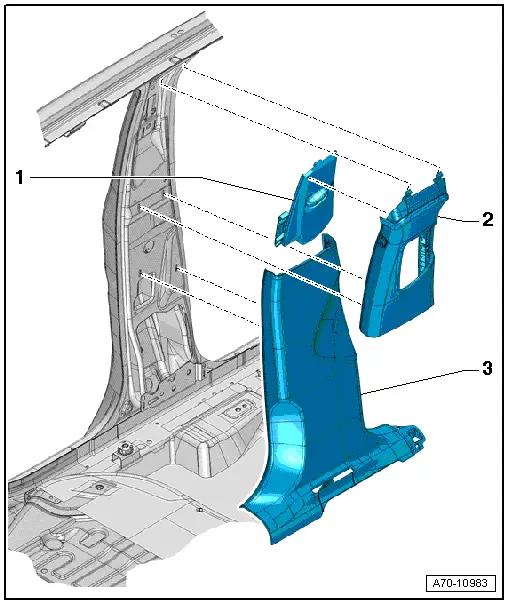
1 - Slider
- For the seat belt height adjuster
- Part of the upper B-pillar trim
- Removing and installing. Refer to → Chapter "B-Pillar Trim Panel, Removing and Installing, Upper B-Pillar Trim Panel".
2 - Upper B-Pillar Trim Panel
- Removing and installing. Refer to → Chapter "B-Pillar Trim Panel, Removing and Installing, Upper B-Pillar Trim Panel".
3 - Lower B-Pillar Trim Panel
- Removing and installing. Refer to → Chapter "B-Pillar Trim Panel, Removing and Installing, Lower B-Pillar Trim Panel".
Overview - C-Pillar Trim Panel
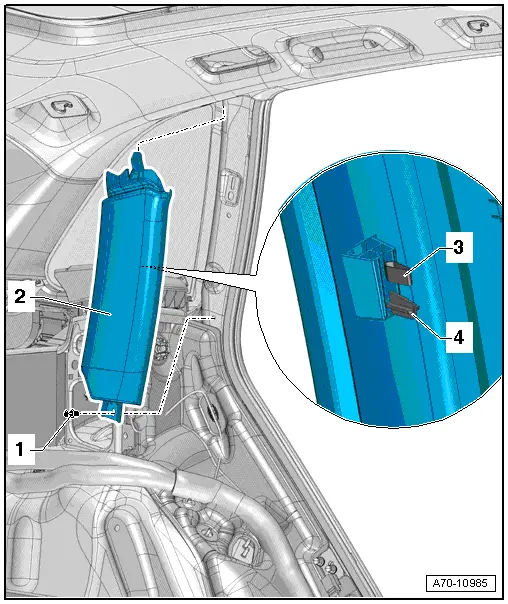
1 - Expanding Clip
2 - C-Pillar Trim
- Removing and installing. Refer to → Chapter "C-Pillar Trim Panel, Removing and Installing".
3 - Bracket
- Insert in the trim panel
- Replace if damaged or deformed
- Remove the clips that are still in the mounting points on the body using the Omega Clip Tool -T40280-.
4 - Centering Pins
Overview - D-Pillar Trim Panel
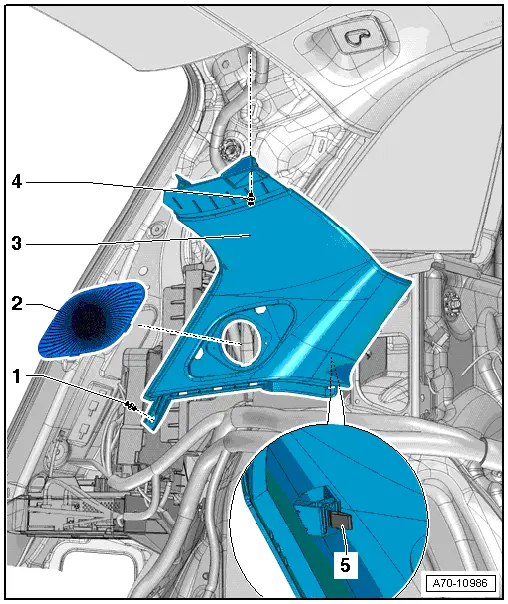
1 - Expanding Clip
2 - Speaker Trim
3 - D-Pillar Trim
- Removing and installing. Refer to → Chapter "D-Pillar Trim Panel, Removing and Installing".
4 - Expanding Clip
5 - Bracket
- Quantity: 3
- Insert in the trim panel
- Replace if damaged or deformed
- Remove the clips that are still in the mounting points on the body using the Omega Clip Tool -T40280-.
Overview - Foot Rest and Carpet
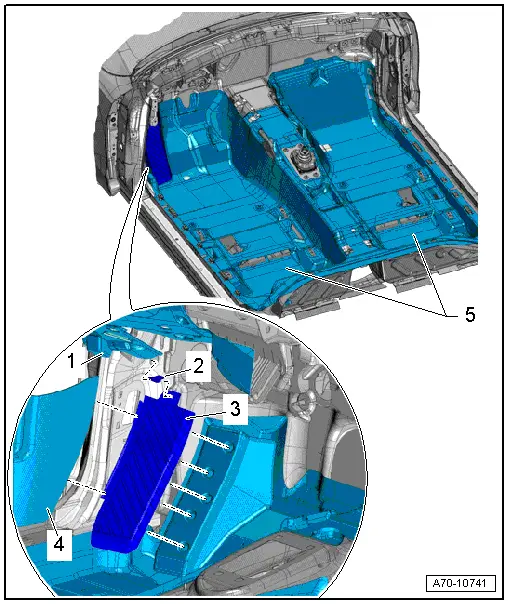
1 - Driver Side Instrument Panel Cover
2 - Bracket
- insert in the footrest
3 - Footrest
- cannot be removed without damaging it
- Removing and installing. Refer to → Chapter "Foot Rest, Removing and Installing".
4 - Front Sill Panel Trim
5 - Carpet
- One piece
- Removing and installing. Refer to → Chapter "Carpet, Removing and Installing".

